Pink Funfetti Animal Cookie Cake
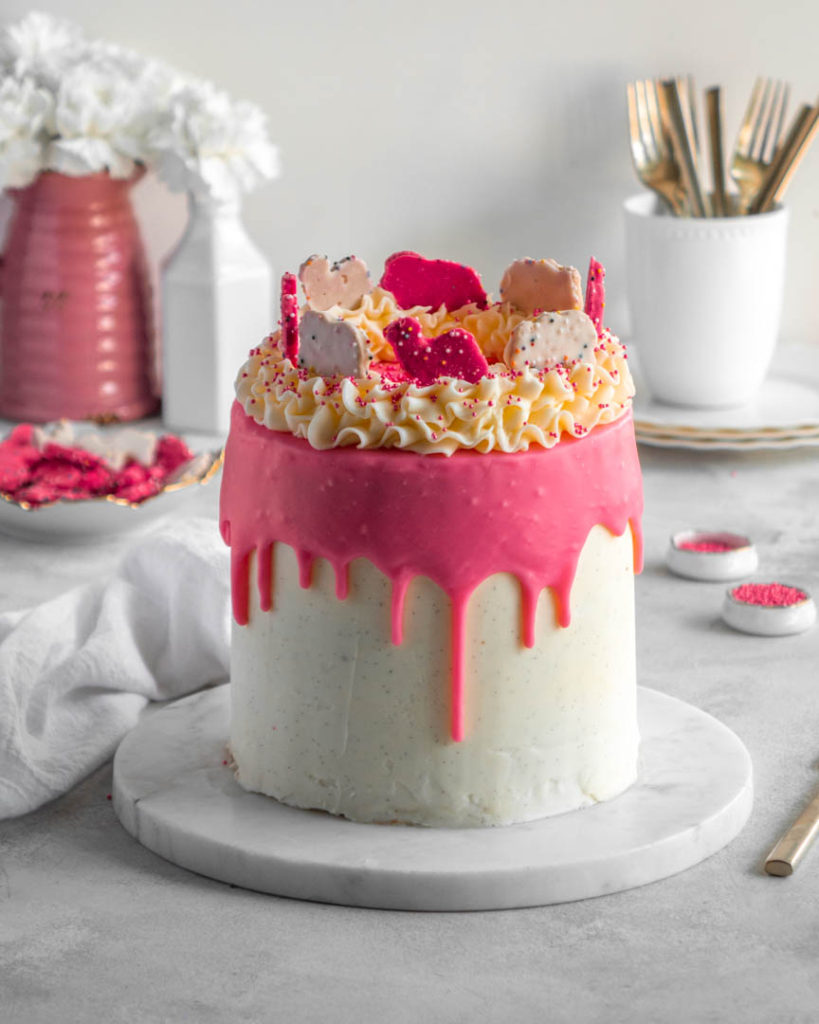
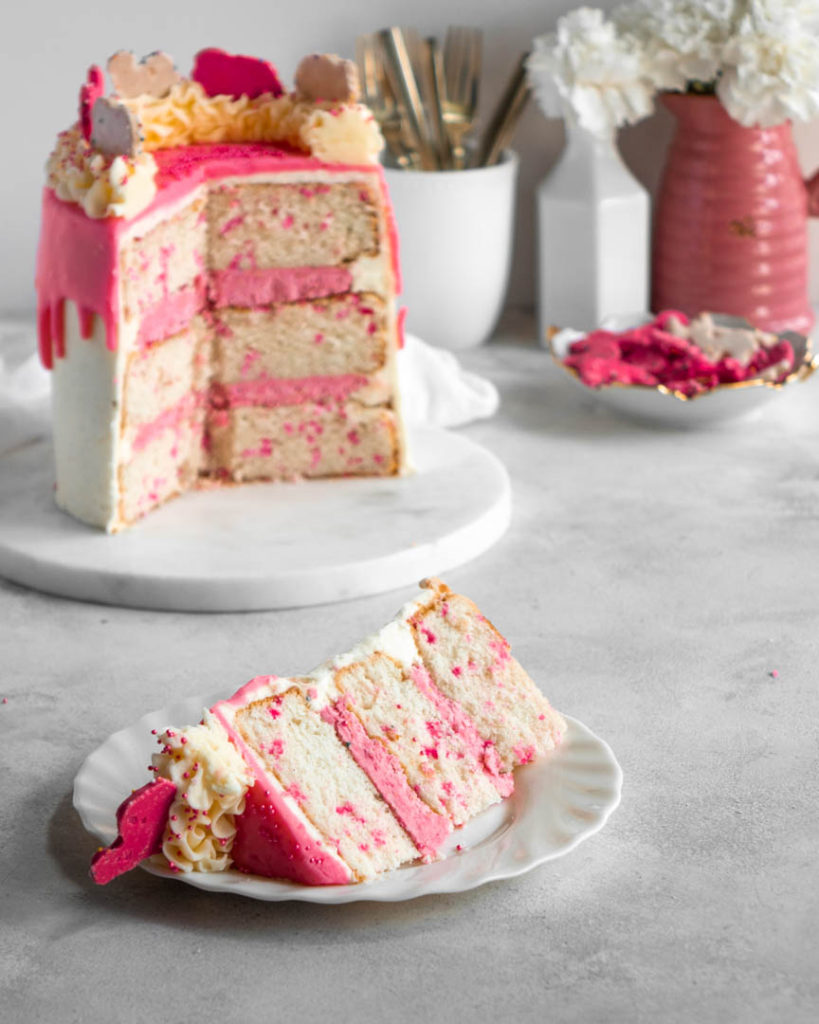
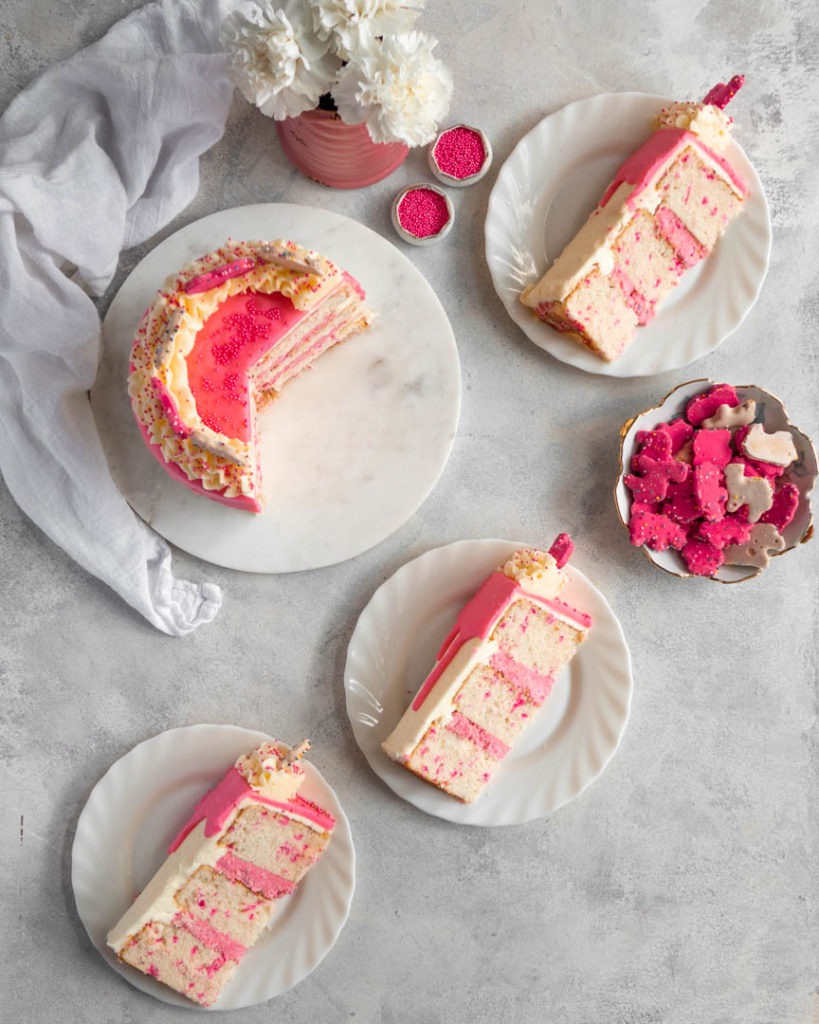
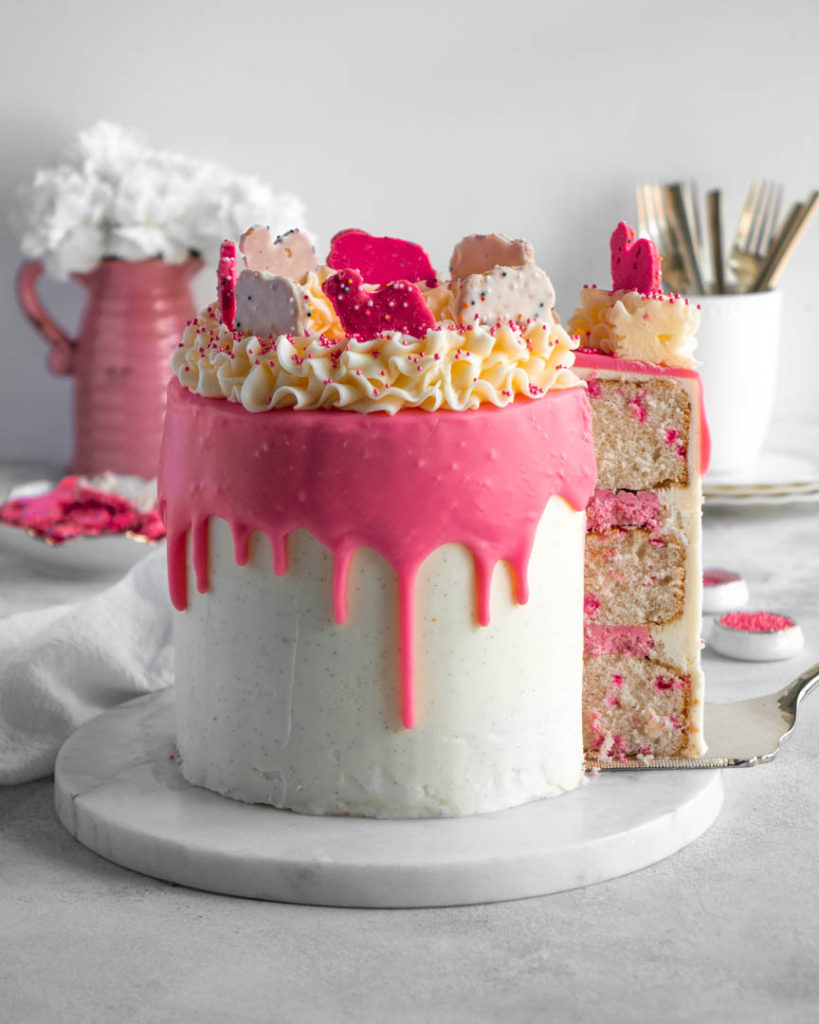
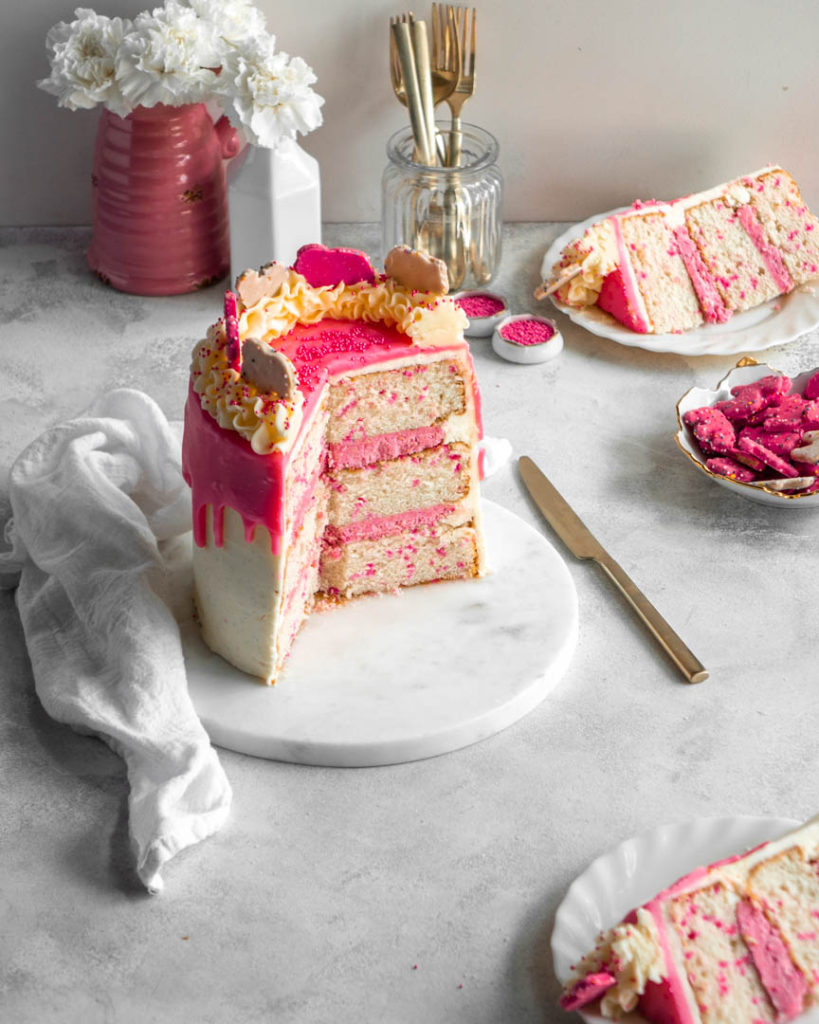
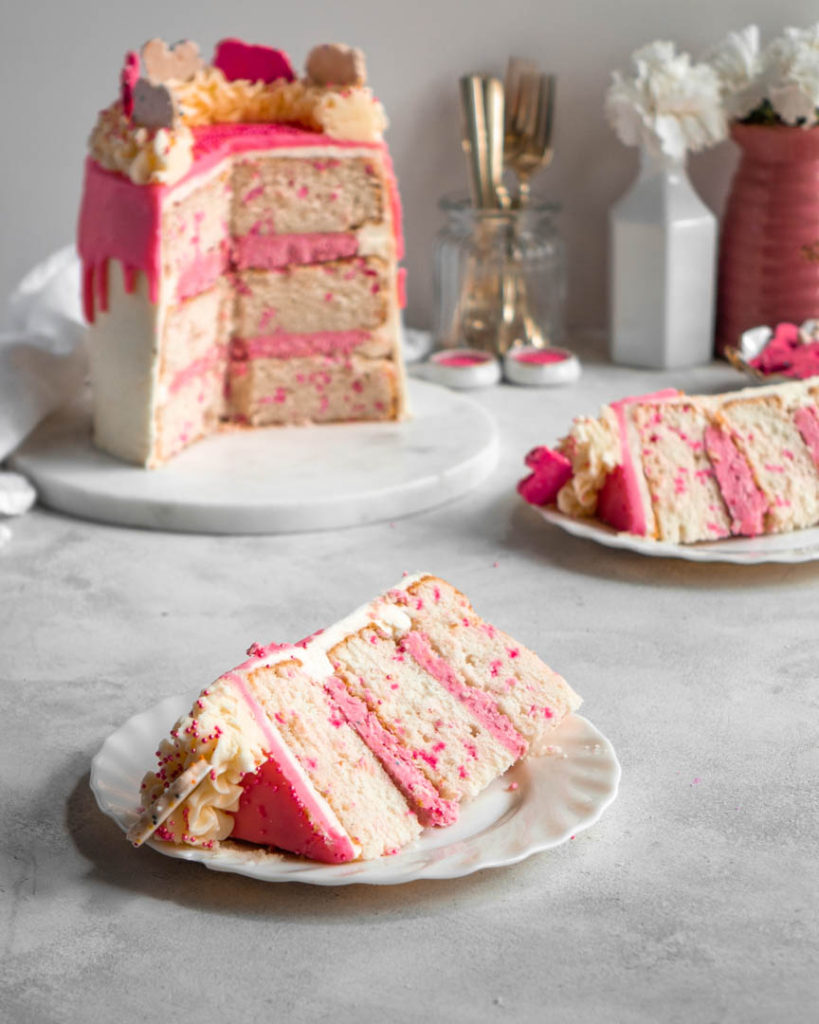
Pink funfetti animal cookie cake with a pink sprinkle white cake, animal cookie filling, vanilla bean buttercream and a pink white chocolate ganache drip.
What is pink funfetti animal cookie cake?
Pink funfetti animal cookie cake is a birthday dream, at least my birthday dream! It’s a three layer white cake with pink sprinkles, it has an animal cookie filling, it’s iced with vanilla bean buttercream and is topped with a pink white chocolate ganache drip. This cake is a little more involved than most cakes, so be sure to read all the steps before beginning to ensure you get great results!
What is needed to make pink funfetti animal cookie cake?
- Cake flour– gives the cake the best consistency
- Baking soda & powder– helps the cake to rise
- Sugar– granulated sugar goes in the cake batter and powdered sugar goes in the icing
- Egg whites– only egg whites are used to keep the cake looking white
- Butter– goes in the cake and icing, make sure it’s softened
- Buttermilk– helps to keep the cake moist
- Salt– helps to bring out all the flavors
- Sprinkles– make sure to use pink jimmies in the cake batter, jimmies or other sprinkles for decorating the cake
- Pink gel food coloring– for the white chocolate ganache
- Vanilla– vanilla bean paste is essential to getting the best funfetti cake and icing flavor
- Animal cookies– iced animal cookies are what we are using in this cake
How to make pink funfetti animal cookie cake:
For the pink funfetti cake:
Start by creaming 10 tbsp of softened butter together with 1 1/2 cups of granulated sugar.
Then add in 4 egg whites along with 1 tbsp of vanilla bean paste.
In a small bowl sift together 2 1/4 cups of cake flour, 1 1/2 tsp of baking powder, 1/4 tsp of baking soda and 1/2 tsp of salt.
Alternate adding 1 cup of buttermilk and the dry ingredients to the butter/sugar/egg mixture. Mix until everything is incorporated.
Lastly mix in 1/4 cup of pink jimmies, the long skinny sprinkles. Any other kind of sprinkle will completely melt away in the cake when baked.
Evenly divide the cake batter between 3 6″ cake pans. Bake the cakes at 350 degrees for 30-34 minutes, or until a cake tester/toothpick comes out clean from the centers.
Let the cakes cool in the pans for 15 minutes, then transfer them to a cooling rack to completely cool.
For the vanilla bean buttercream:
In a large bowl add 2 1/2 cups (5 sticks) of softened, unsalted butter and beat on medium speed with an electric mixer until the butter is smooth and pale in color.
Then add in 3 3/4 cups of powdered sugar a little at a time until it is all combined. Next add in 1/4 tsp of salt and 2 tsp of vanilla bean paste.
The frosting should be thick but easily spreadable.
For the animal cookie filling:
Pulse 1 1/2 cups of iced animal cookies in a food processor until super finely ground. Transfer the cookie crumbs to a bowl and add in 1 cup of the frosting. Mix until completely combined.
For the pink white chocolate ganache drip:
White chocolate ganache is different from traditional chocolate ganache where the ratios of cream to chocolate are 1:1. White chocolate ganache uses the ratios of 3:1. 3 parts white chocolate, 1 part heavy cream.
Microwave 1/3 cup of heavy cream for about 45 seconds, just until the cream is about to boil.
Place 1 cup of chopped white chocolate in a medium sized bowl. Use a high quality white chocolate, like Lindt, for the best results.
Pour the hot cream over the white chocolate and let it sit for 5 minutes. Stir the chocolate until it is completely mixed into the cream. Then add a few drops of pink gel food coloring into the ganache until the desired color is reached.
Let the gancahe cool slightly before using.
Assembling the pink funfetti animal cookie cake:
Once the cakes are completely cooled assemble the cake. You can simply fill each layer with the animal cookie filling, ice the outside with the vanilla bean buttercream and then pour the white chocolate ganache over the top. However, if you are looking to make a really beautiful cake, follow these extra steps
For these steps you will need:
- a cake scrapper
- a rotating cake turntable
- a cake frosting spatula
- a sharp knife
- an icing piping bag fitted with a small circular tip
- an icing piping bag fitted with a large star tip
Getting perfectly sized cake layers:
Once the cakes are completely cooled, wrap them in plastic wrap and place them in the freezer for a few hours. Once they are frozen, or nearly frozen, remove them from the freezer and begin to make each layer as similar in size as possible. Usually you will only have to cut the tops off of each cake layer. With a sharp knife, remove the tops from each cake layer until each are flat and can be stacked to where the cake is even. So, each layer should sit flat on each other without the cake leaning.
Creating the crumb layer:
Then place a dollop of vanilla bean buttercream frosting in the center of your cake turntable. Place the first cake layer over it. Then add a small amount of vanilla bean buttercream frosting on top of the cake layer and even it out with your frosting spatula, turning the cake table as you go. Add half of the animal cookie filling and even it out across the cake layer. Place the next layer over top and repeat the step. Then place the final layer over the top and place small dollops of frosting on the outsides and top of the cake. Even out the frosting as much as possible with your frosting spatula.
Then with your cake scraper, scrape the icing across the cake, turning the cake table as you go to make this as easy as possible. This layer of frosting should be very thin. This is called the ‘crumb layer’ and will ensure that the cake’s final coating of frosting is smooth and free of crumbs. Freezing the cake layers before frosting them also helps tremendously with this step.
Final frosting layer:
Once the crumb layer of frosting has been applied, place the cake in the fridge for at least 30 minutes to allow the frosting to harden. Once the cake has chilled in the fridge, remove it and apply the final coating of frosting. Apply generous dollops of frosting on the sides and top of the cake and smooth them out with your cake frosting spatula. Then with your cake scraper even out the frosting, turning the cake table as you go, to give you an even coating of vanilla bean buttercream frosting. Make sure it is not too thin so you do not see the layers underneath, unless of course that it is how you want it to look. (You may have to apply a layer of frosting, place the cake back in the fridge for 30 minutes and repeat the step to ensure the frosting is on thick enough and the cake cannot be seen underneath).
Pink white chocolate ganache drip:
Once the final layer of frosting is applied, place the cake back in the fridge to chill for another 30 minutes, up to an hour. While the cake chills prepare the white chocolate ganache by pouring it into an icing piping bag fitted with a small circular tip. The ganache should be slightly warm but not hot and come easily out of the icing bag. Once chilled, remove the cake from the fridge.
Go around the top edges of the cake and squeeze the white chocolate ganache so it starts to drip down the sides of the cake. A good tip is to space out your drips about every inch. If at first it doesn’t look like it will be a long enough drip, wait a few minutes. The ganache will continue to drip down the sides of the cake. Also squeeze ganache around the top of the cake and smooth it out slightly with a clean frosting spatula. As it sits the ganache will smooth out and come together to form a beautiful finish on top of the cake.
Decorating the cake:
Place the cake back in the fridge for 30 minutes to an hour to let the ganache harden up a bit. While it is chilling, place the remaining vanilla bean buttercream frosting in a piping bag fitted with a large star tip. Once the cake is chilled, remove it from the fridge and go along the top edges of the cake with the buttercream frosting to create a ruffle. Do this by slowly moving the piping bag back and forth in a small zigzag formation. Practice on a cutting board before to get the feel for it. Once your ruffle is on you can decorate the top of the cake with extra animal cookies and pink sprinkles or whatever else you think would look beautiful!
Serve this cake right away, or keep in the fridge until ready to serve. Store left overs in an airtight container in the fridge for up to three days for the freshest, best flavor.
If you make this cake please tag me on Instagram @inbloombakery_ so I can see your pretty cake! Follow me on Pinterest for other dessert ideas!
Other cake recipes to try:
Pumpkin Cupcakes with Cream Cheese Frosting
Pink Funfetti Animal Cookie Cake
Ingredients
For the Pink Funfetti Cake
- 1 1/2 tsp baking powder
- 1/4 tsp baking soda
- 2 1/4 cups cake flour
- 1/2 tsp salt
- 1 cup buttermilk
- 10 tbsp softened unsalted butter
- 1 1/2 cups granulated sugar
- 4 egg whites
- 1 tbsp vanilla bean paste
- 1/4 cup pink jimmies (long skinny sprinkles)
- extra pink sprinkles and animal cookies for decorating
For the Vanilla Bean Buttercream
- 2 1/2 cups (5 sticks) softened, unsalted butter
- 3 3/4 cups powdered sugar
- 2 tsp vanilla bean paste
- 1/4 tsp salt
For the Animal Cookie Filling
- 1 1/2 cups frosted animal cookies
- 1 cup of prepared above frosting
For the Pink White Chocolate Ganche
- 1 cup chopped white chocolate
- 1/3 cup heavy cream
- pink gel food coloring
Instructions
For the Pink Funfetti Cake
- Preheat oven to 350 degrees.
- Start by creaming 10 tbsp of softened butter together with 1 1/2 cups of granulated sugar.
- Then add in 4 egg whites along with 1 tbsp of vanilla bean paste and mix for two minutes until it is paler and color and slightly fluffy.
- In a small bowl sift together 2 1/4 cups of cake flour, 1 1/2 tsp of baking powder, 1/4 tsp of baking soda and 1/2 tsp of salt.
- Alternate adding 1 cup of buttermilk and the dry ingredients to the butter/sugar/egg mixture. Mix until everything is incorporated.
- Lastly mix in 1/4 cup of pink jimmies, the long skinny sprinkles. Any other kind of sprinkle will completely melt away in the cake when baked.
- Evenly divide the cake batter between 3 6" cake pans. Bake the cakes for 30-34 minutes, or until a cake tester/toothpick comes out clean from the centers. Let the cakes cool in the pans for 15 minutes, then transfer them to a cooling rack to completely cool.
For the Vanilla Bean Buttercream
- In a large bowl add 2 1/2 cups (5 sticks) of softened, unsalted butter and beat on medium speed with an electric mixer until the butter is smooth and pale in color.
- Then add in 3 3/4 cups of powdered sugar a little at a time until it is all combined.
- Next add in 1/4 tsp of salt and 2 tsp of vanilla bean paste. The frosting should be thick but easily spreadable.
For the Animal Cookie Filling
- Pulse 1 1/2 cups of iced animal cookies in a food processor until super finely ground.
- Transfer the cookie crumbs to a bowl and add in 1 cup of the frosting. Mix until completely combined.
For the Pink White Chocolate Ganache
- Microwave 1/3 cup of heavy cream for about 45 seconds, just until the cream is about to boil.
- Place 1 cup of chopped white chocolate in a medium sized bowl.
- Pour the hot cream over the white chocolate and let it sit for 5 minutes.
- Stir the chocolate until it is completely mixed into the cream.
- Then add a few drops of pink gel food coloring into the ganache until the desired color is reached. Let the ganache cool slightly before using.
Assembling the Cake
- Once the cakes are completely cooled assemble the cake. You can simply fill each layer with the animal cookie filling, ice the outside with the vanilla bean buttercream and then pour the white chocolate ganache over the top. However, if you are looking to make a really beautiful cake, follow the extra steps in the above blog post.
