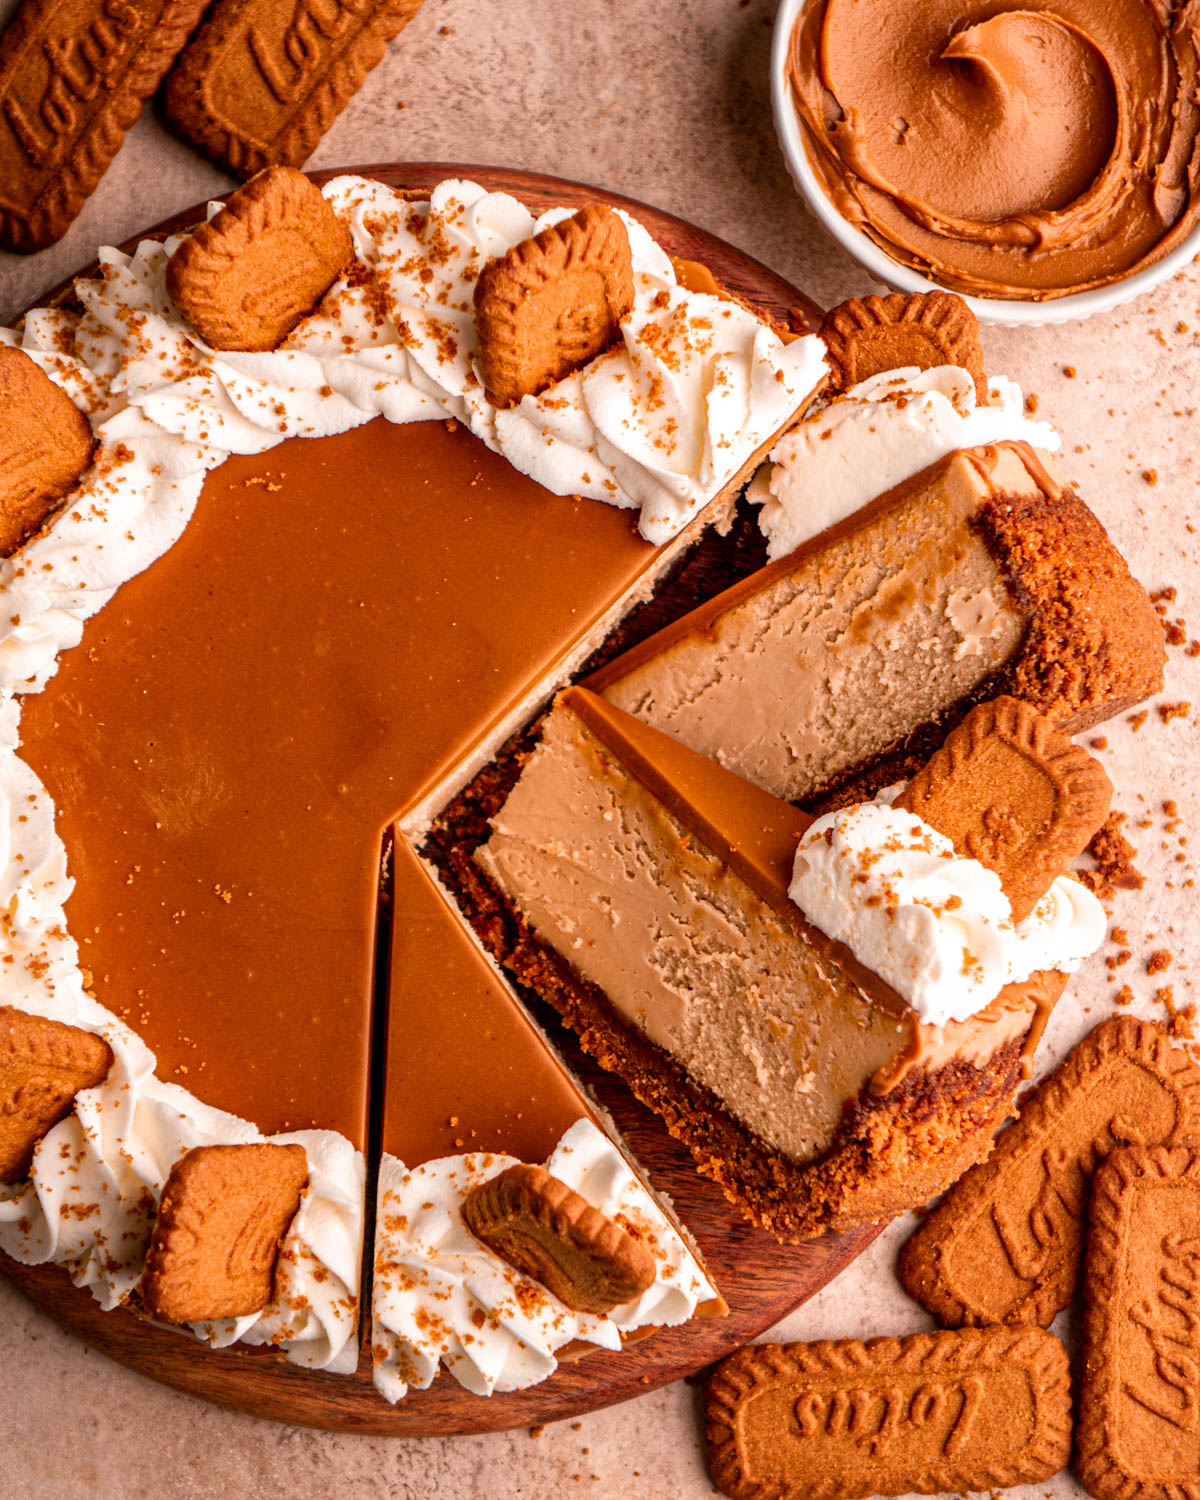
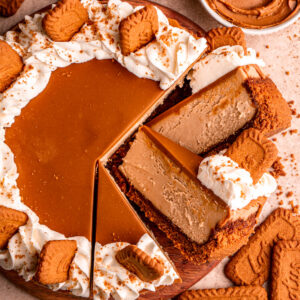
Biscoff Cheesecake
This is the best Biscoff cheesecake recipe! It’s a simple recipe for creamy, cookie butter cheesecake with a Biscoff cookie crust, topped with cookie butter. This cheesecake is perfect dessert for all the Biscoff lovers in your life!
If you’re looking for other Biscoff recipes, check out my Biscoff butter cookies and Nutella cookie butter cupcakes!
Try these other cheesecake recipes: coffee cheesecake, triple chocolate cheesecake, no bake cheesecake, white chocolate salted caramel cheesecake, pumpkin cheesecake or apple pie cheesecake!
Why You’ll Love This Biscoff Cheesecake
It’s full of cookie butter flavor- This delicious cheesecake is flavored with Biscoff butter and topped with more after baking for the best cookie butter taste!
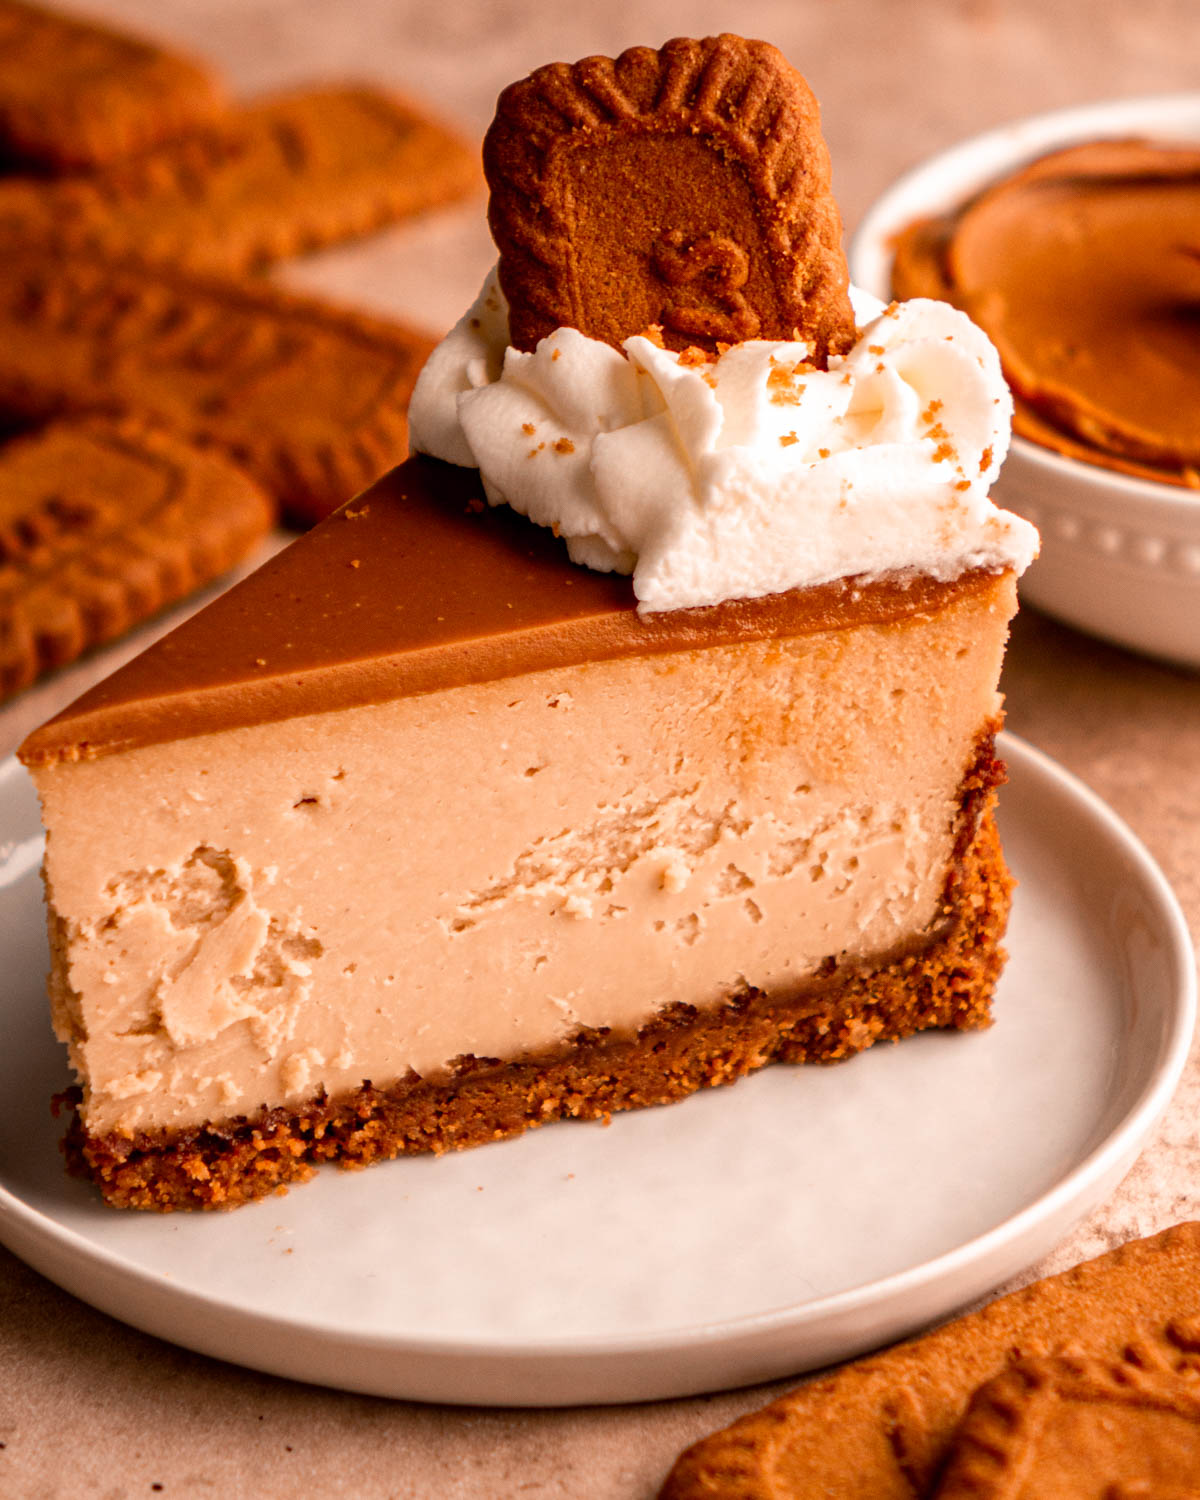
It’s super creamy cheesecake- The cheesecake filling is so light and has the best fluffy, creamy texture. Each bite truly melts in your mouth.
It has an Biscoff cookie crust– The Biscoff cookie crust pairs perfectly with the all the cookie butter goodness.
Simple Ingredients for this Biscoff Cheesecake Recipe
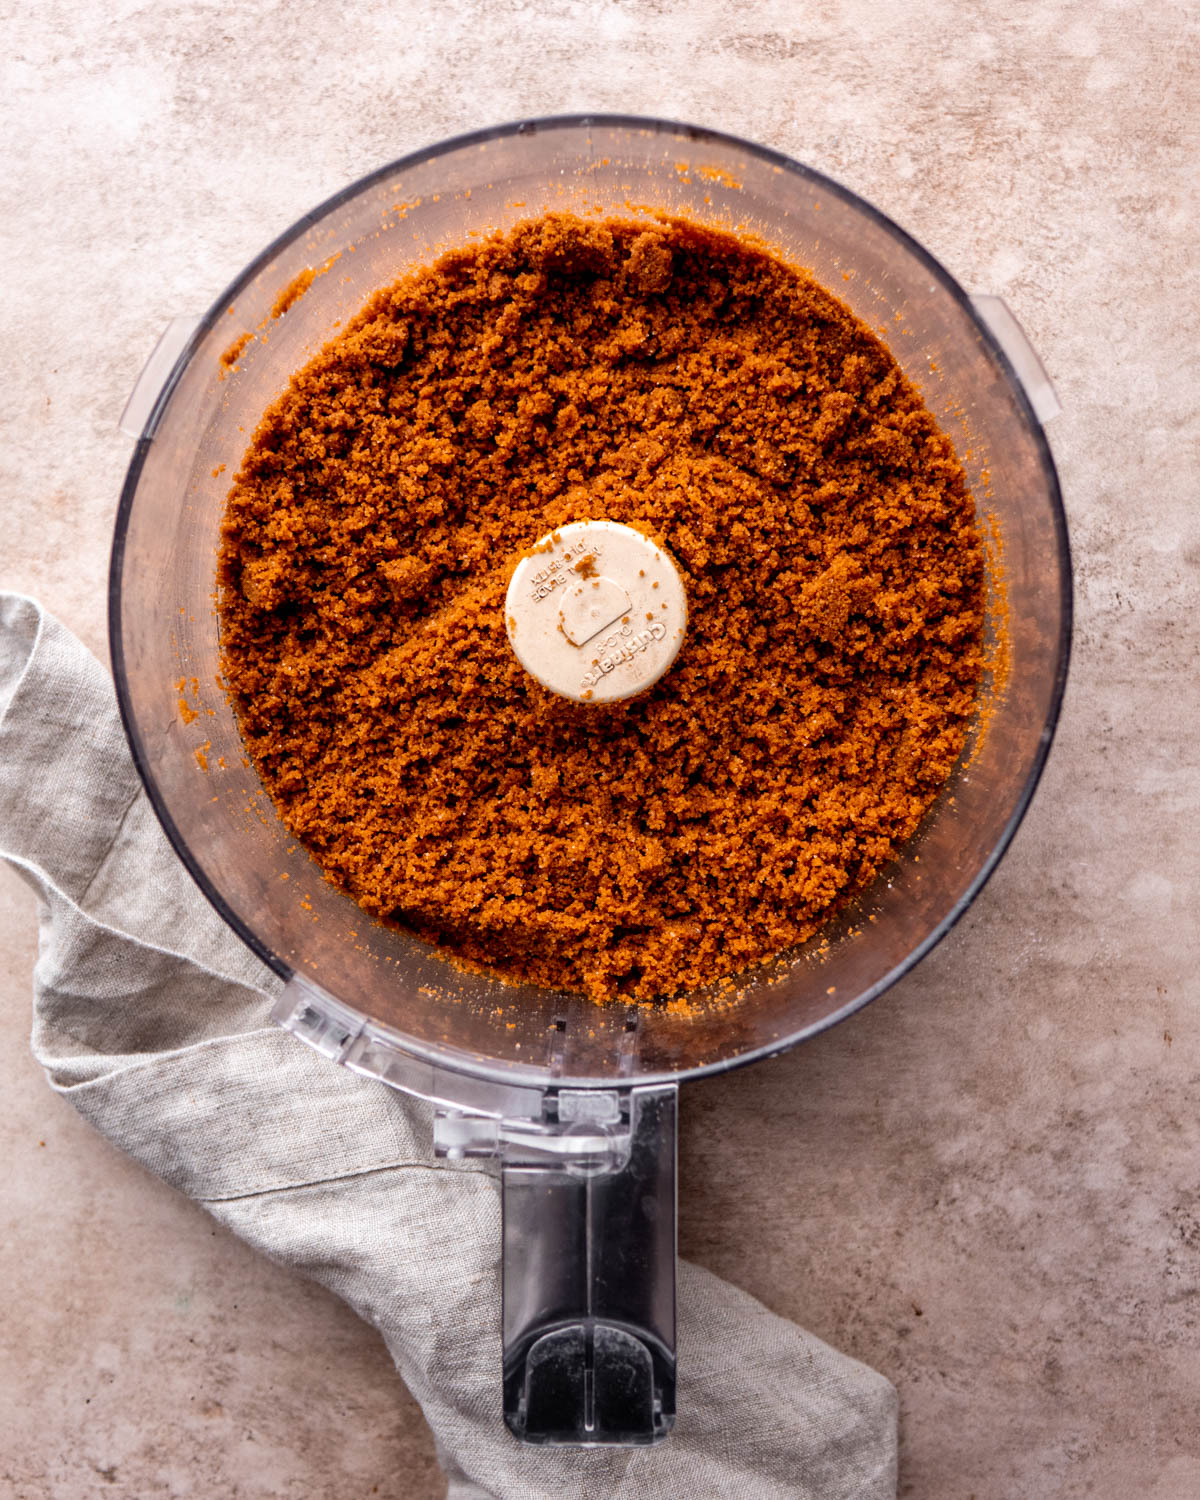
- Lotus Biscoff Cookies – crushed and used for the cookie crust
- Biscoff Cookie Butter- used in the cheesecake batter and for topping the cheesecake with
- Butter– used in the crust
- Granulated Sugar– used to sweeten the cheesecake
- Vanilla Extract – adds a sweet note to the cheesecake
- Cream Cheese– make sure you’re using softened cream cheese
- Eggs– make sure they are at room temperature
- Sour Cream– gives the cheesecake a little extra creaminess, make sure it’s at room temperature
- Cornstarch–used in the cheesecake to give it the best texture
Step by Step Instructions
Please see the recipe card below for the complete measurements!
STEP ONE: Pulse the Biscoff cookies in a food processor until they are fine crumbs. Add in the melted butter and sugar and pulse to combine together.
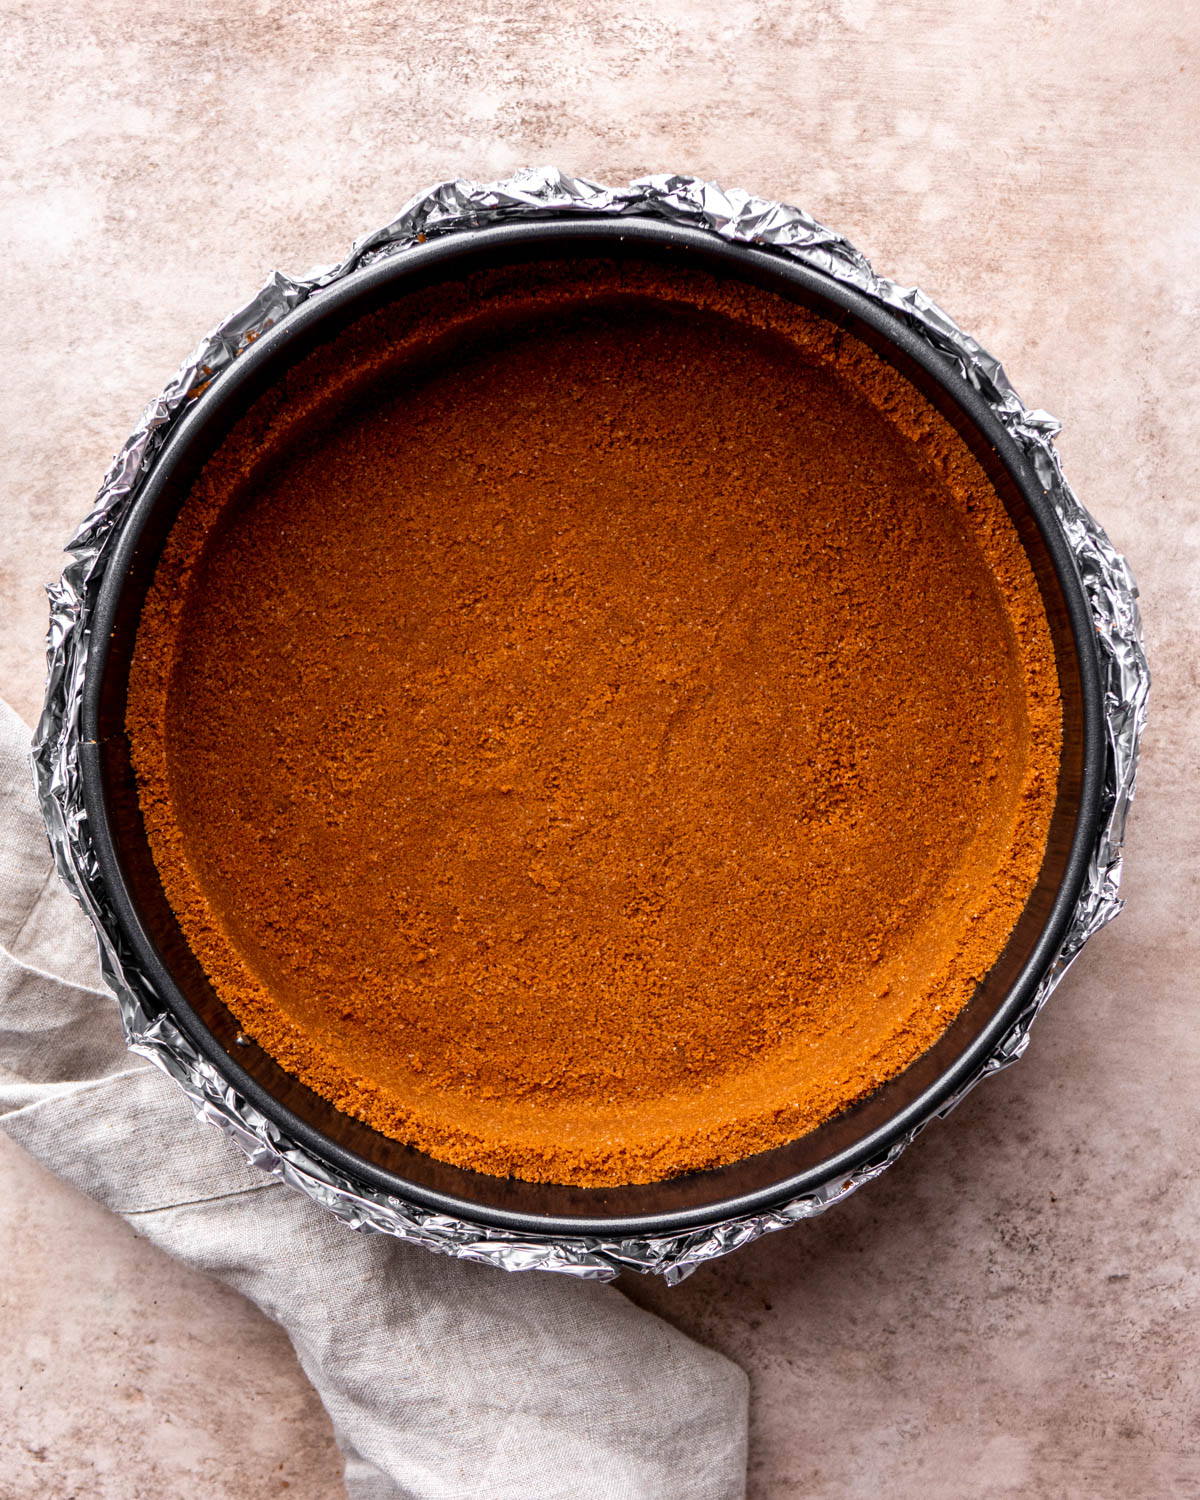
STEP TWO: Wrap a 9 inch springform pan with tinfoil. Press the Biscoff crumbs into the bottom of the springform pan. Bake then let cool.
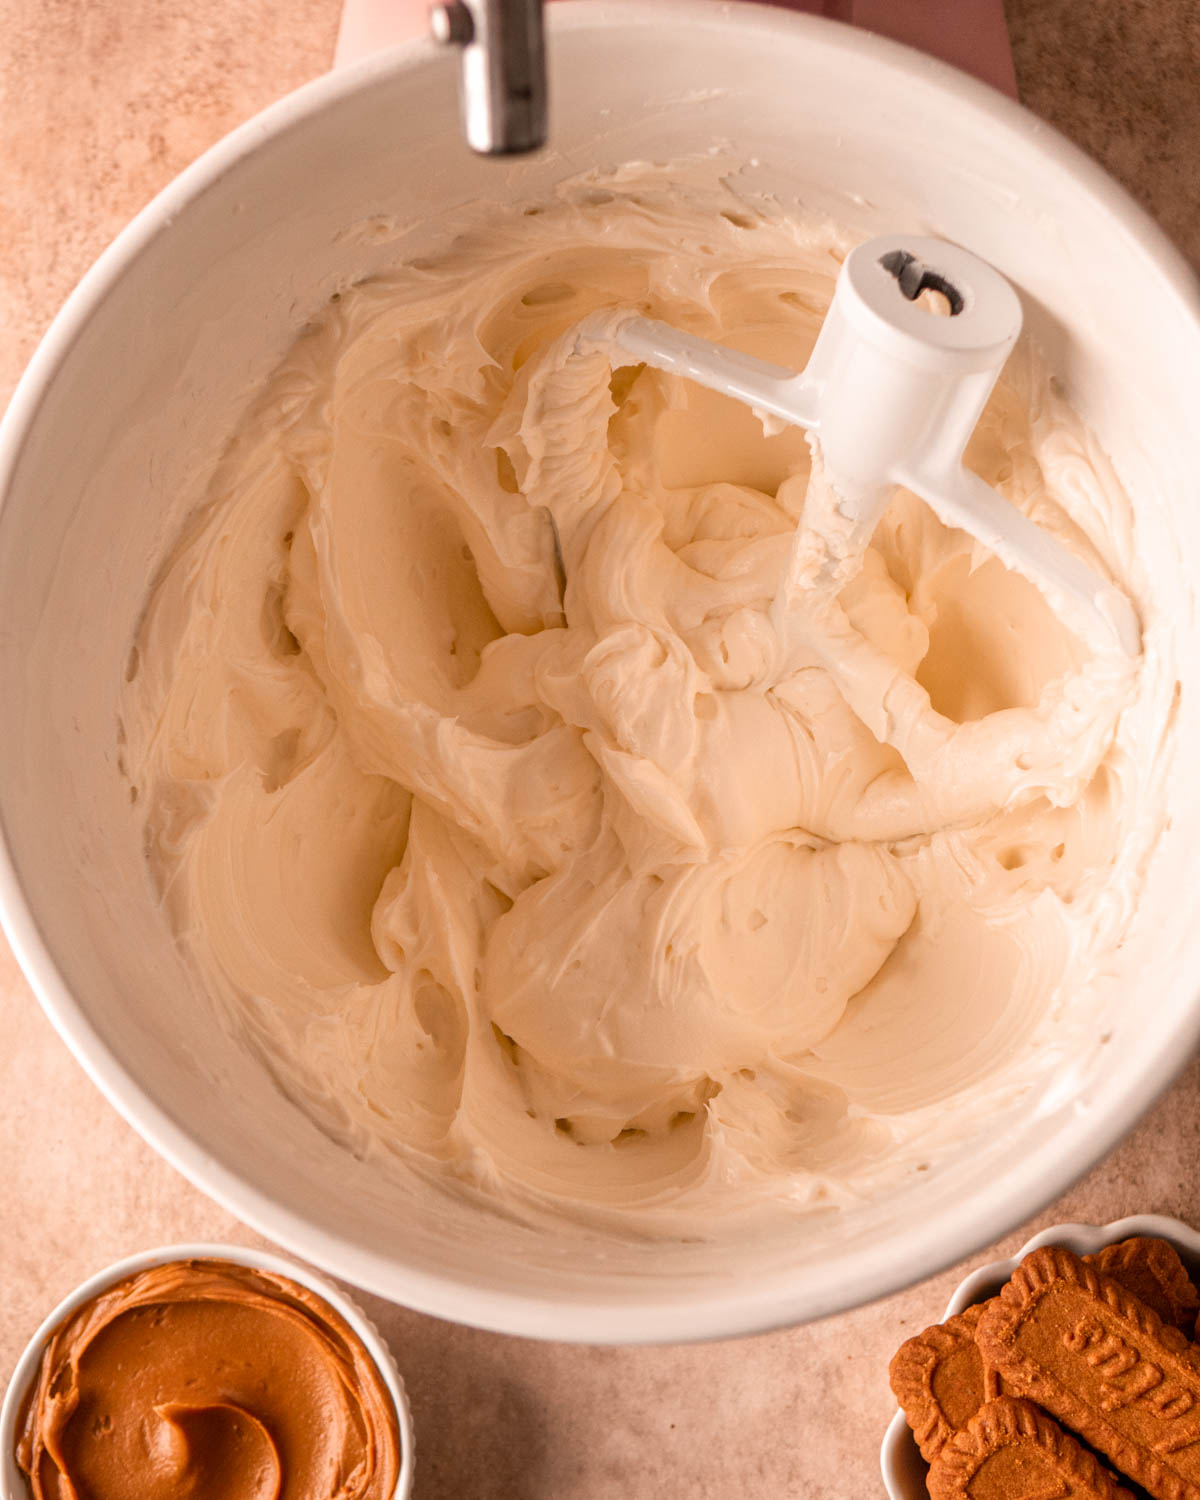
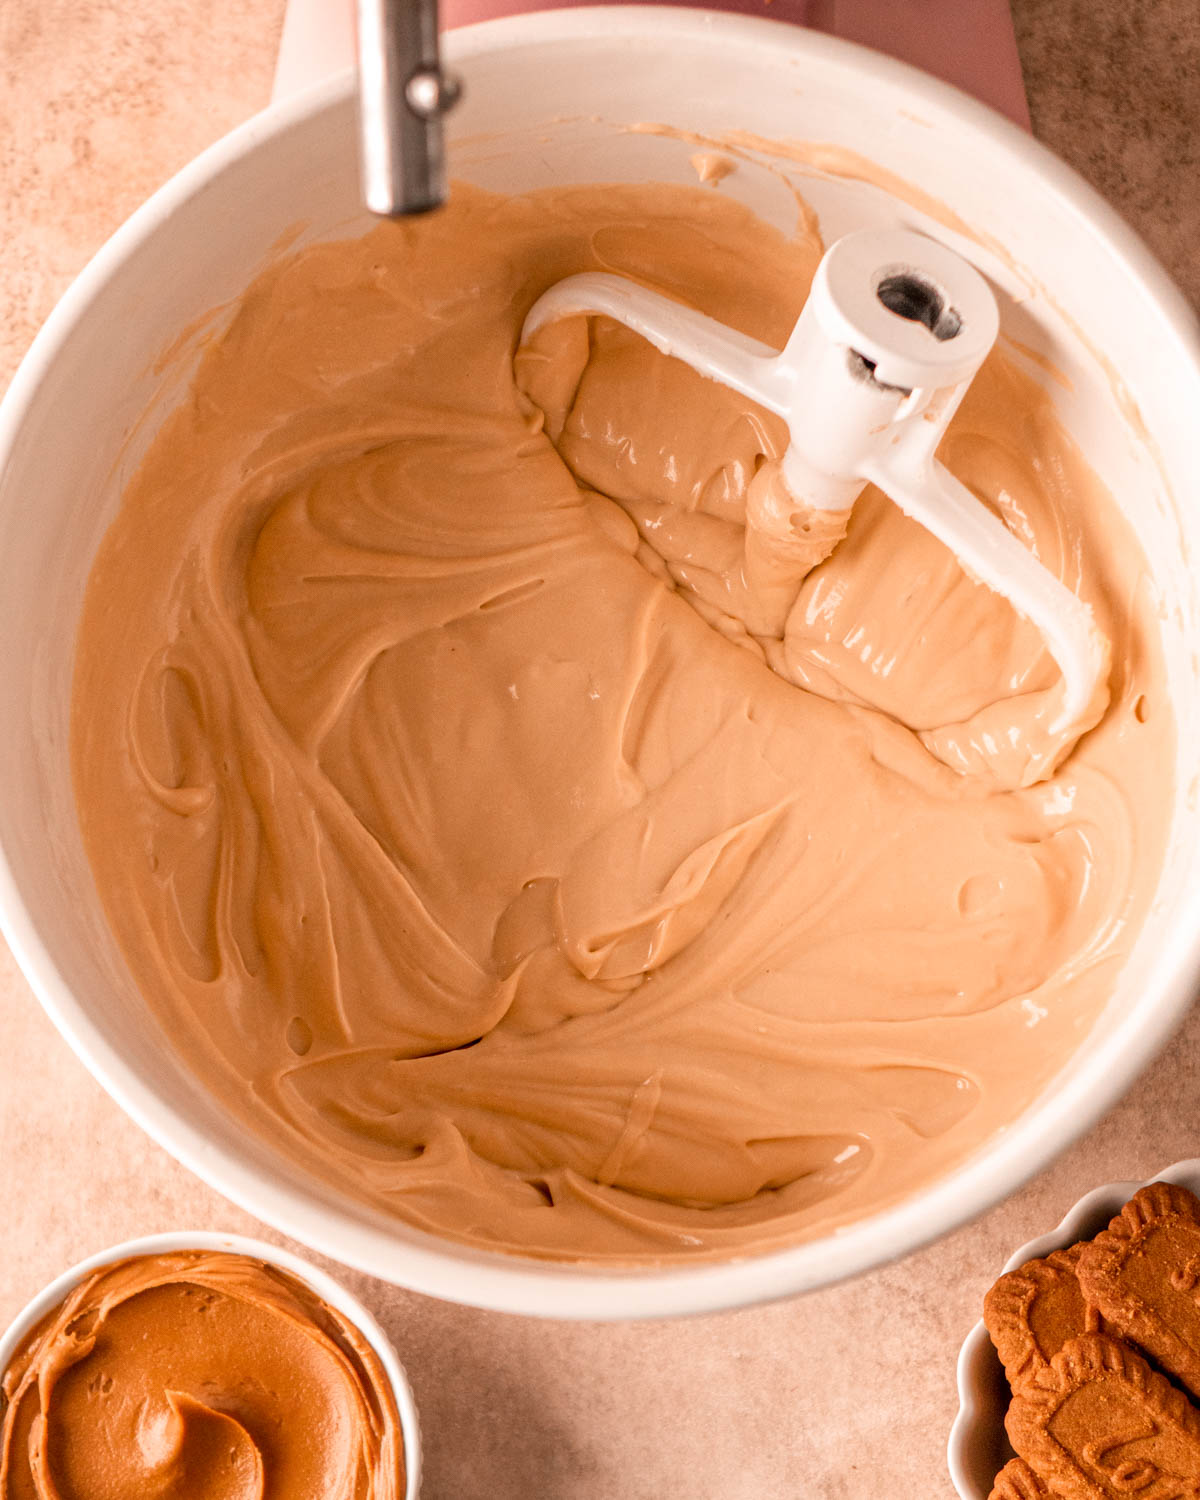
STEP THREE: In a large bowl of a stand mixer, mix the room temperature cream cheese, corn starch and sugar together with a paddle attachment on medium speed for two minutes until everything is smooth and there are no lumps. (You can alternatively use a hand mixer and a large mixing bowl). Scrape down the bottom and sides of the bowl to ensure everything has been mixed well.
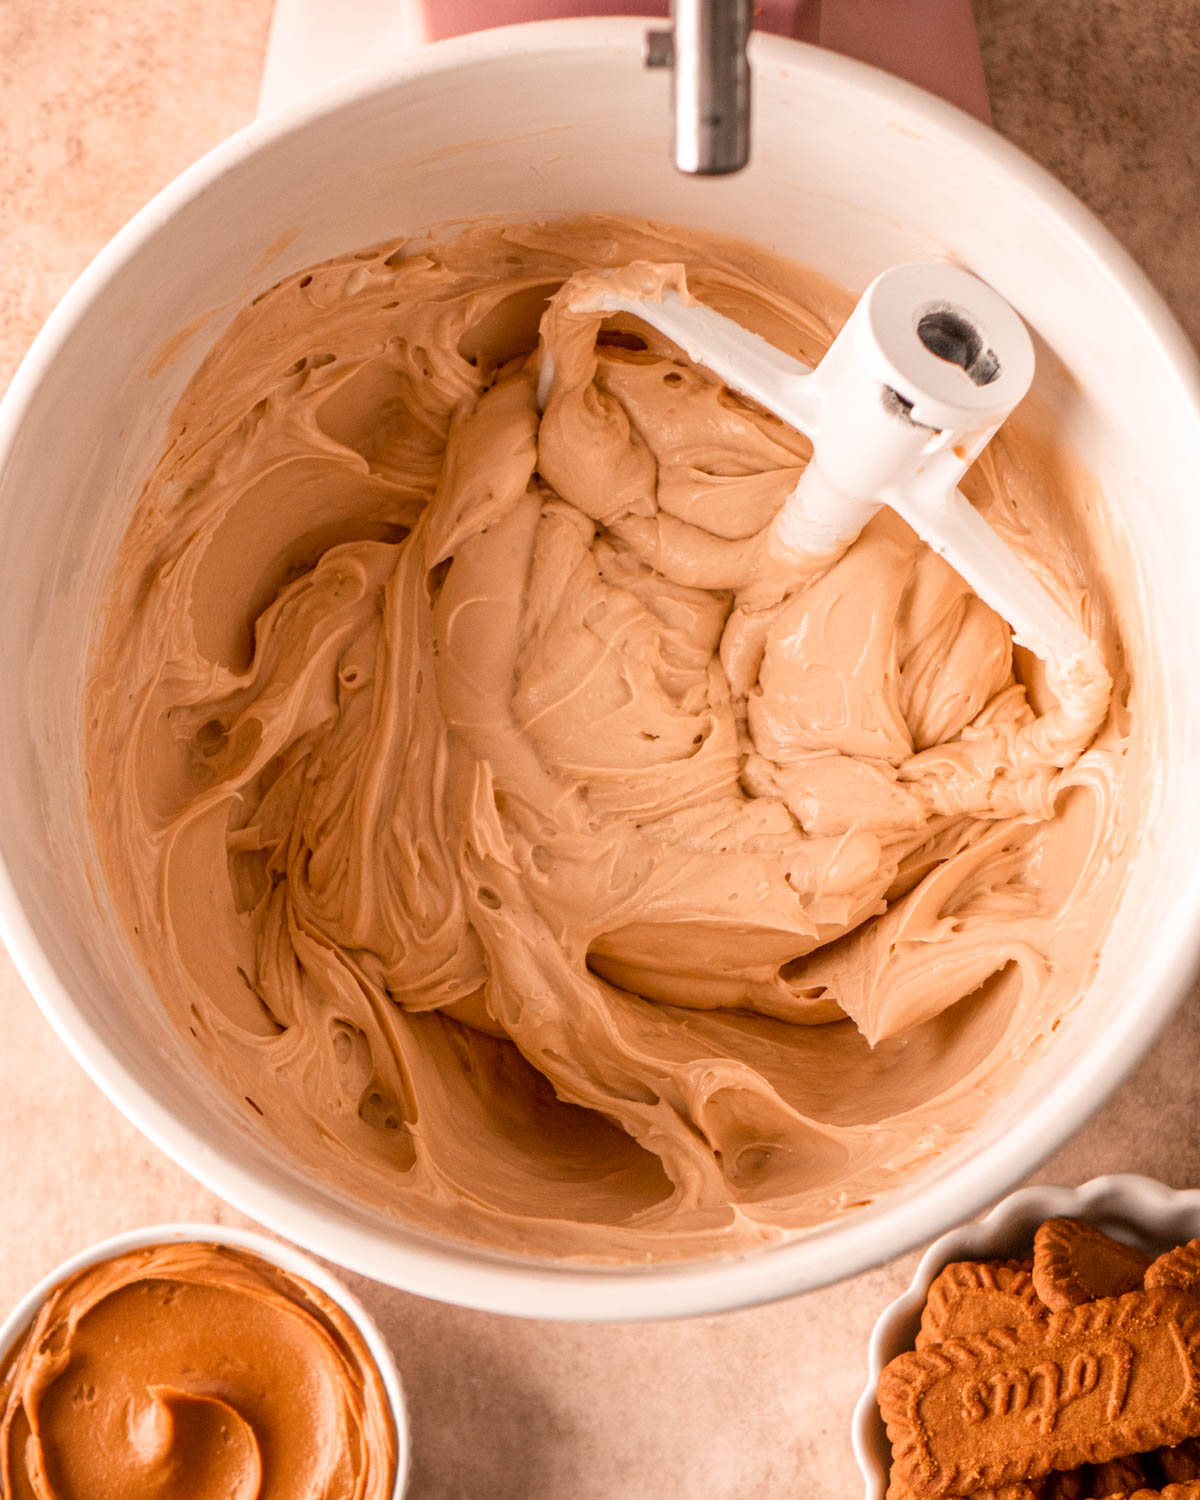
STEP FOUR: Add in the Lotus Biscoff spread, vanilla and sour cream to the cream cheese mixture. Mix for 1 minute on medium speed. Scrape the sides and bottom of bowl again to ensure everything is mixed together.
STEP FIVE: Next add in the eggs and egg yolks one at a time to the cheesecake batter. Mix on medium speed, ensuring that each is fully mixed in before adding the next. As soon as the last one is fully mixed in, turn off the mixer. Do not over mix the batter.
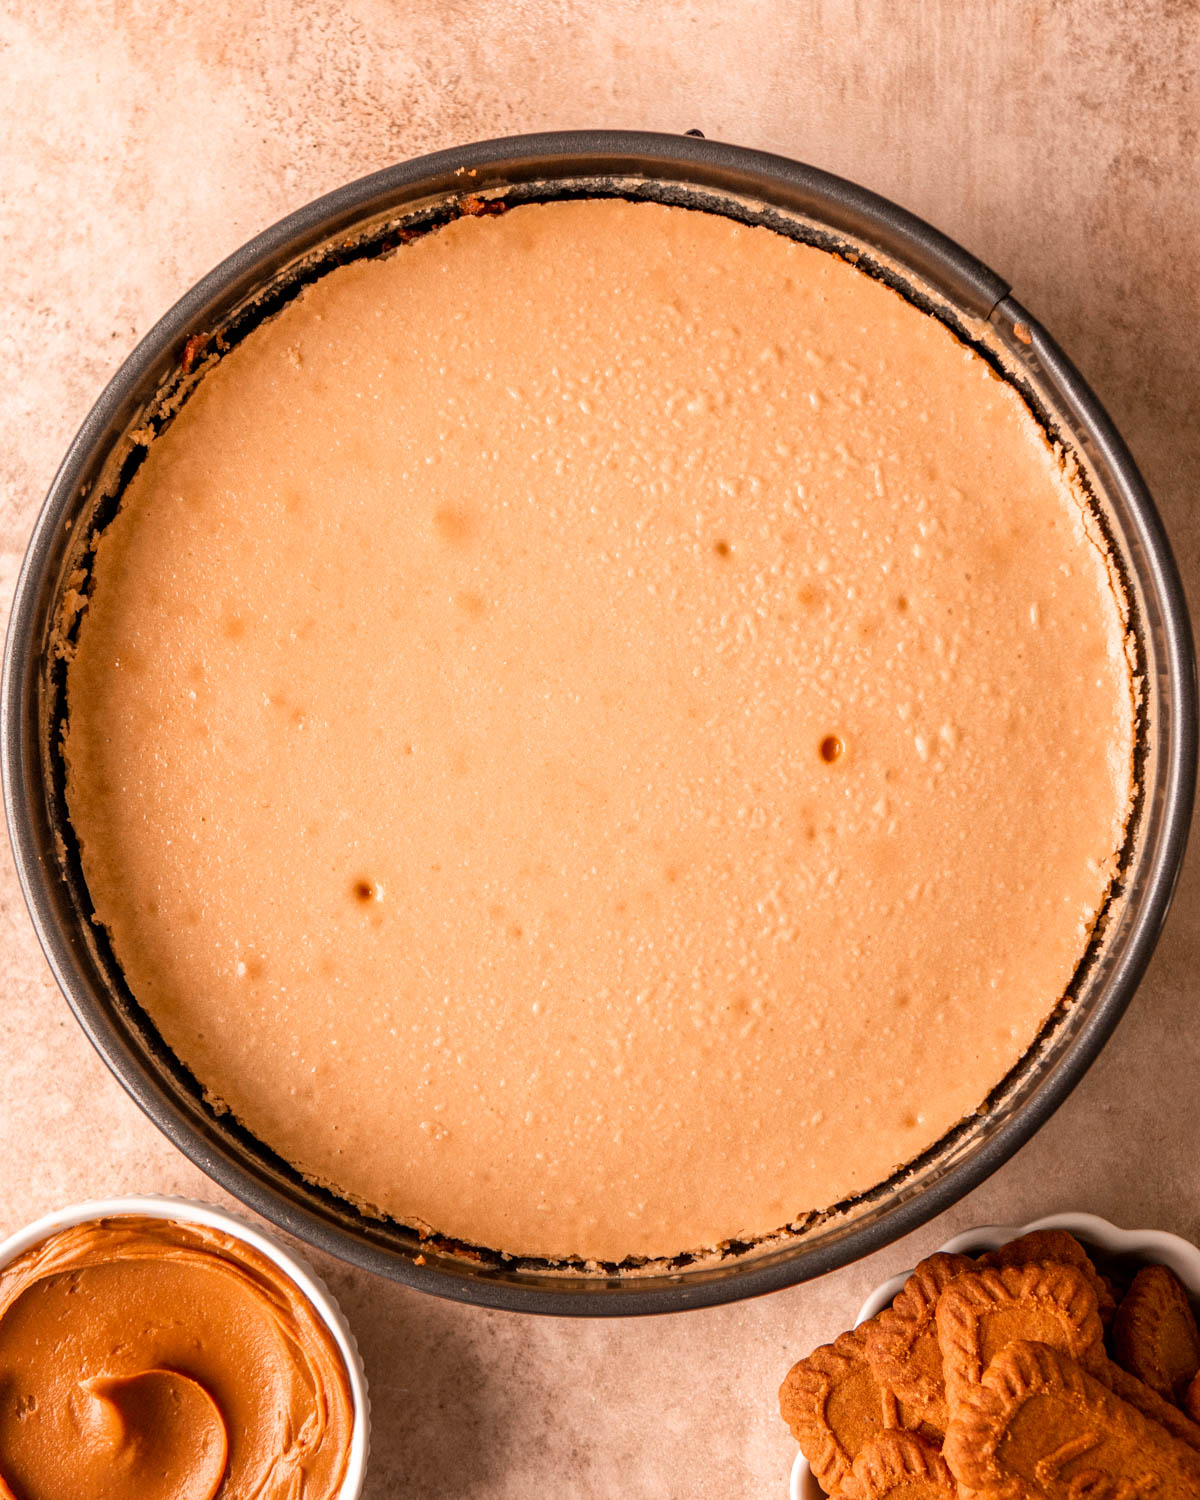
STEP SIX: Pour the batter into the prepared cheesecake pan with the crust. Place the cheesecake in a large roasting pan in the oven. Slowly pour hot water in to the pan around the cheesecake being careful not to splash the cheesecake.
STEP SEVEN: Bake at 350 degrees for 1 hour. When an hour is up, turn off the oven and crack the door open. It helps to use a wooden utensil to keep the oven door slightly open. Let the cheesecake stay in the oven for 1 more hour. The cheesecake will continue to bake as it is cooling. (This is the best method I’ve used when making cheesecake and it results in a perfectly baked top with no cracks or sinking every time.)
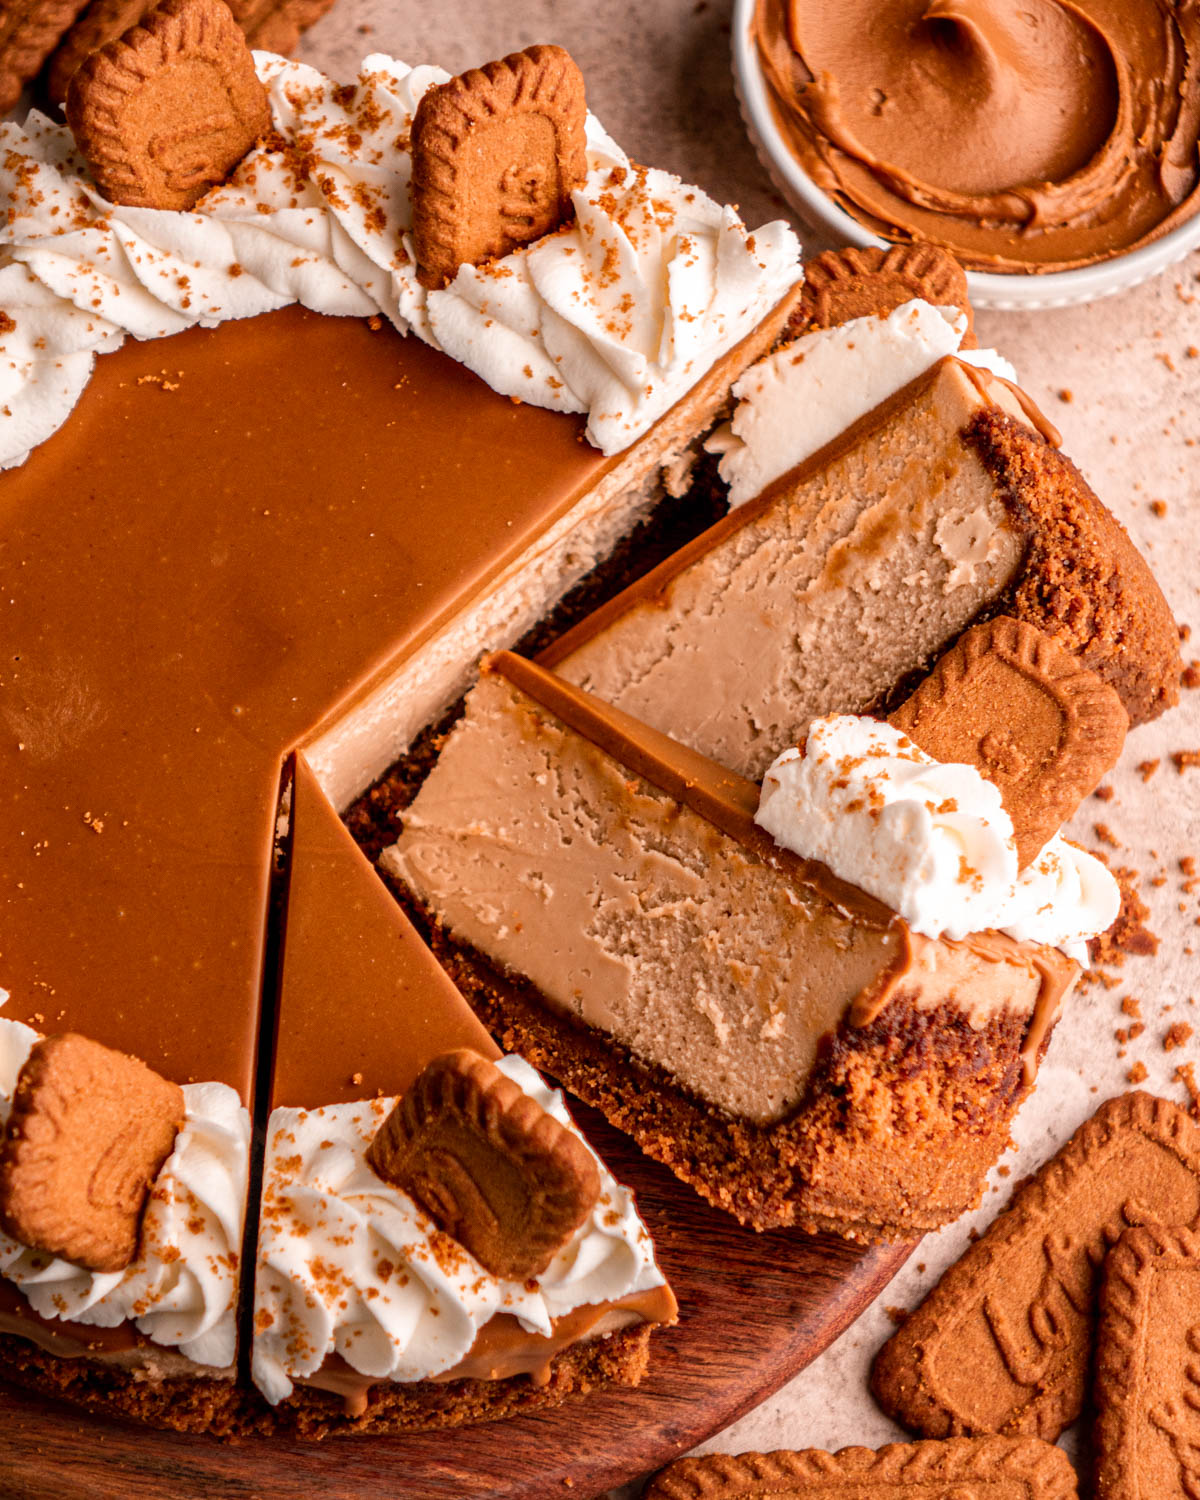
STEP EIGHT: Once the 2 hours are up, remove the cheesecake from the oven and go around the edges of the pan with a butter knife to loosen the crust from the sides of the pan. Let the cheesecake cool completely on the counter. Cover with tin foil or plastic wrap, and refrigerate until cold, at least 8 hours. (I usually bake the night before and let it refrigerate overnight).
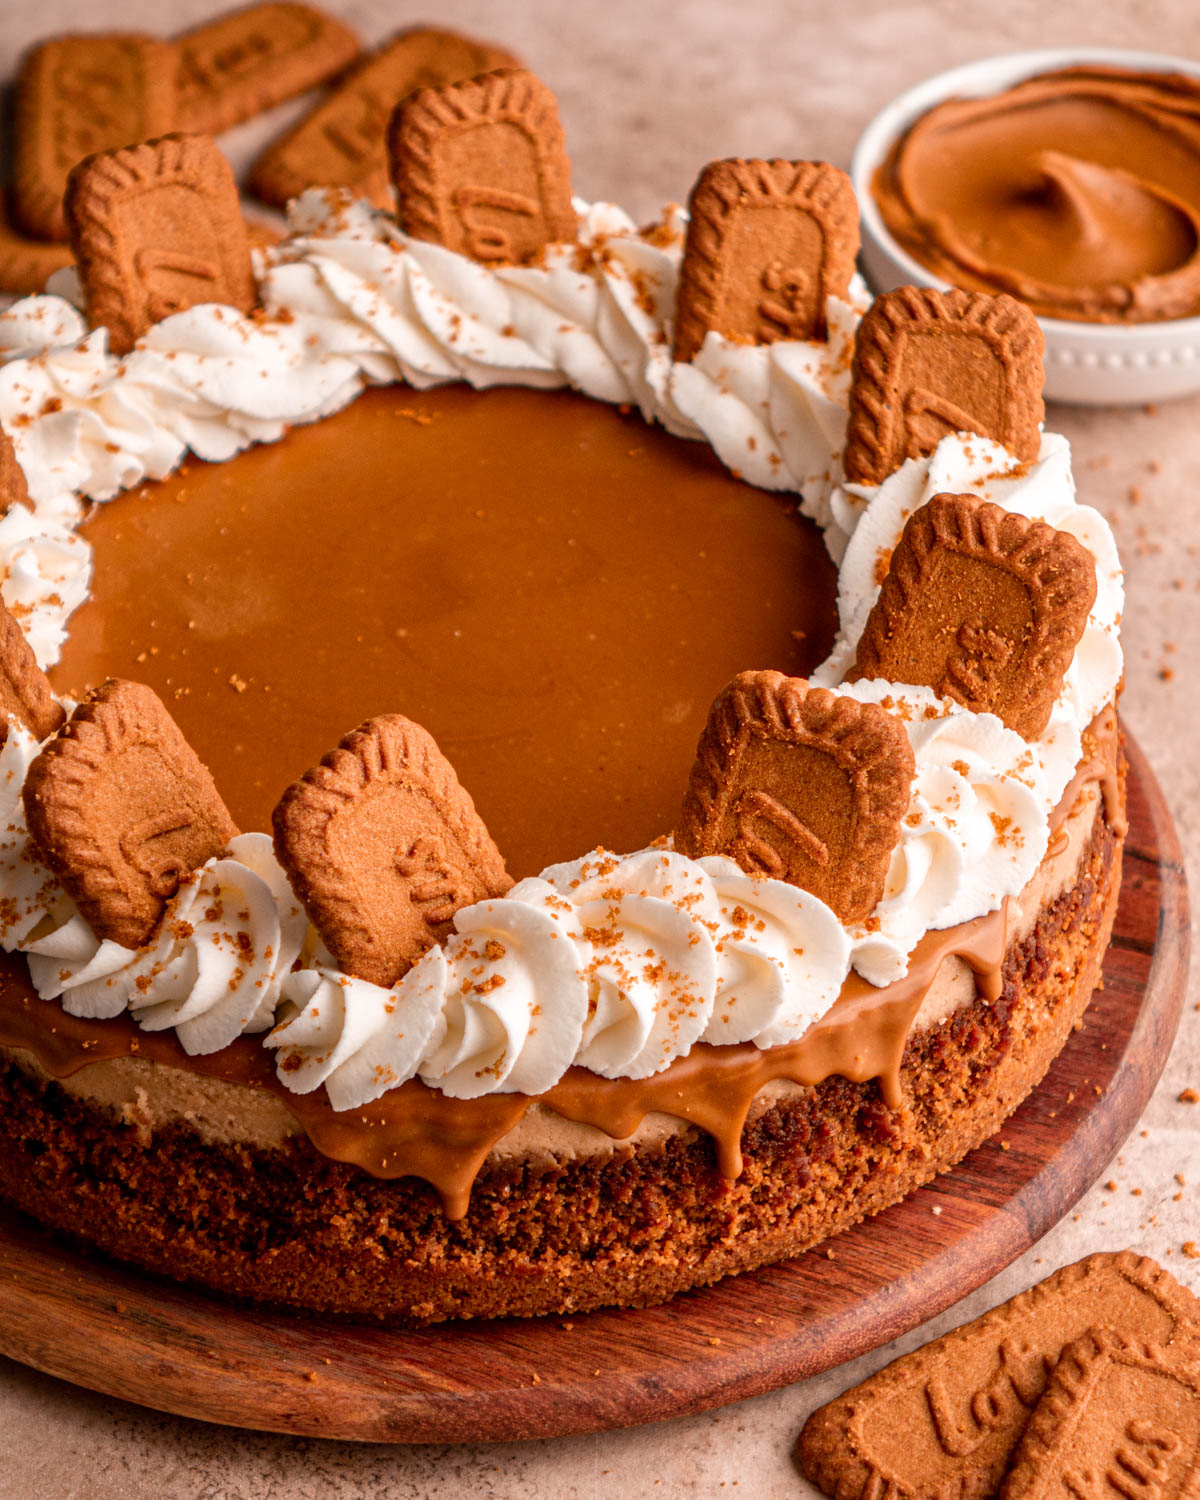
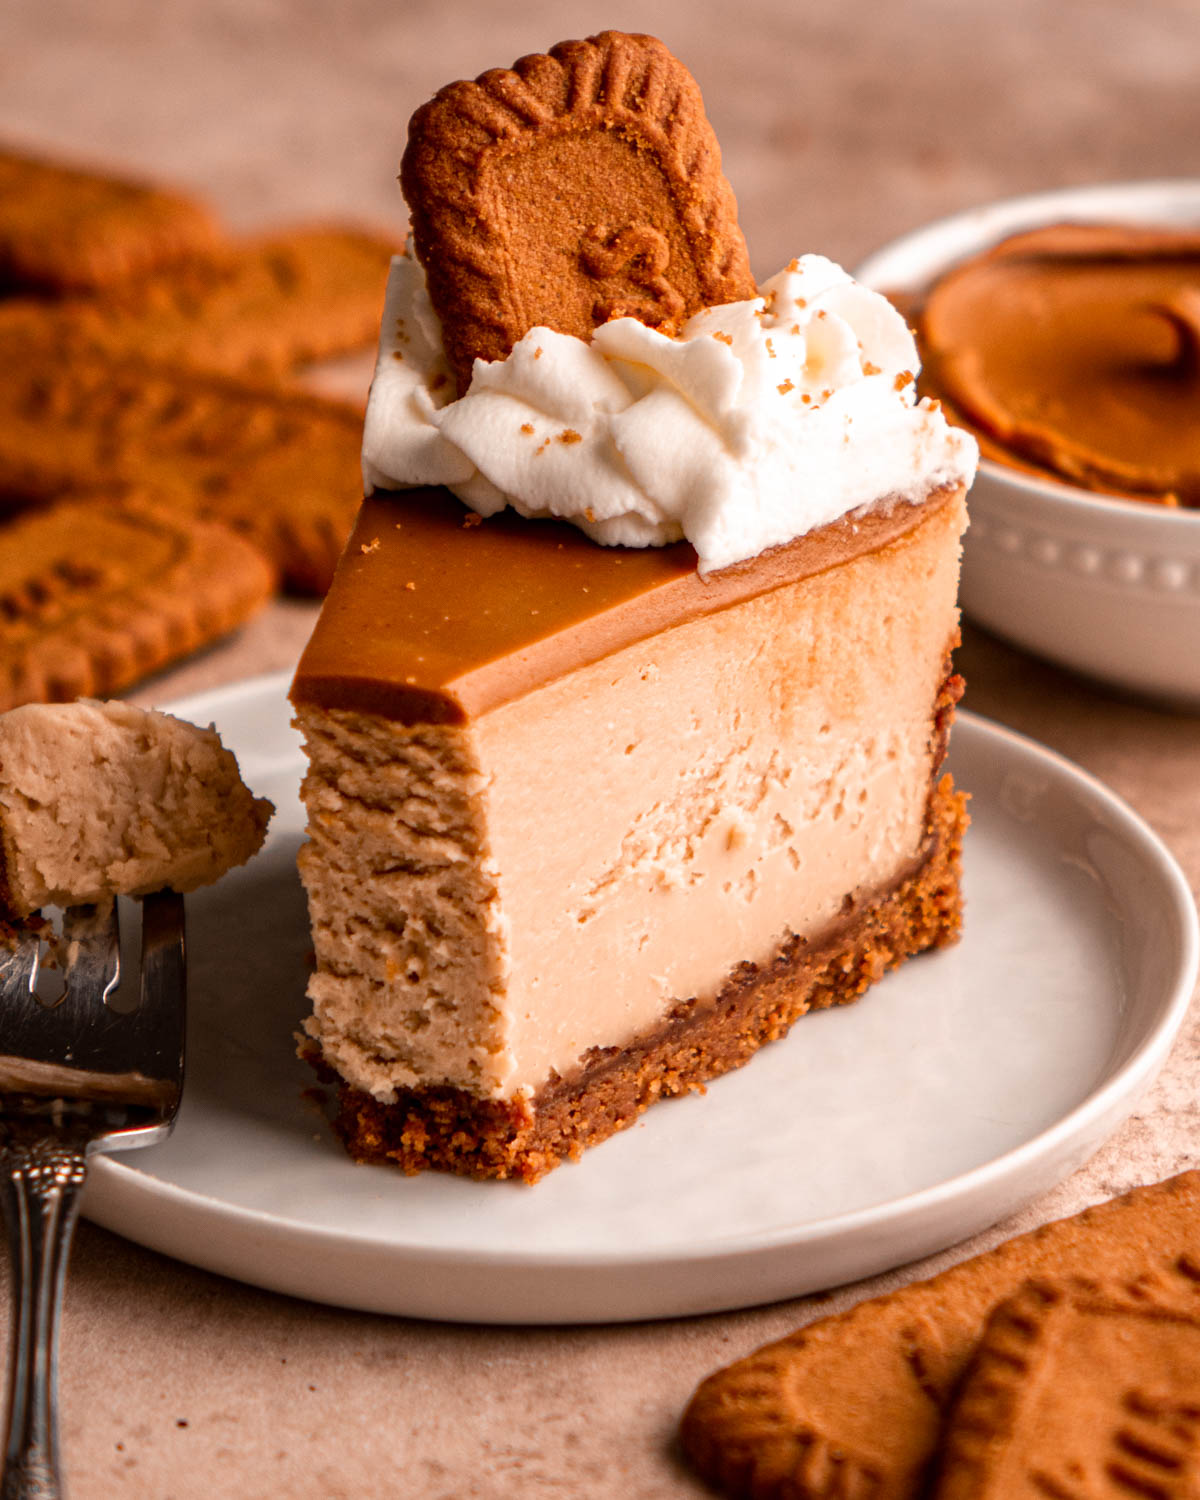
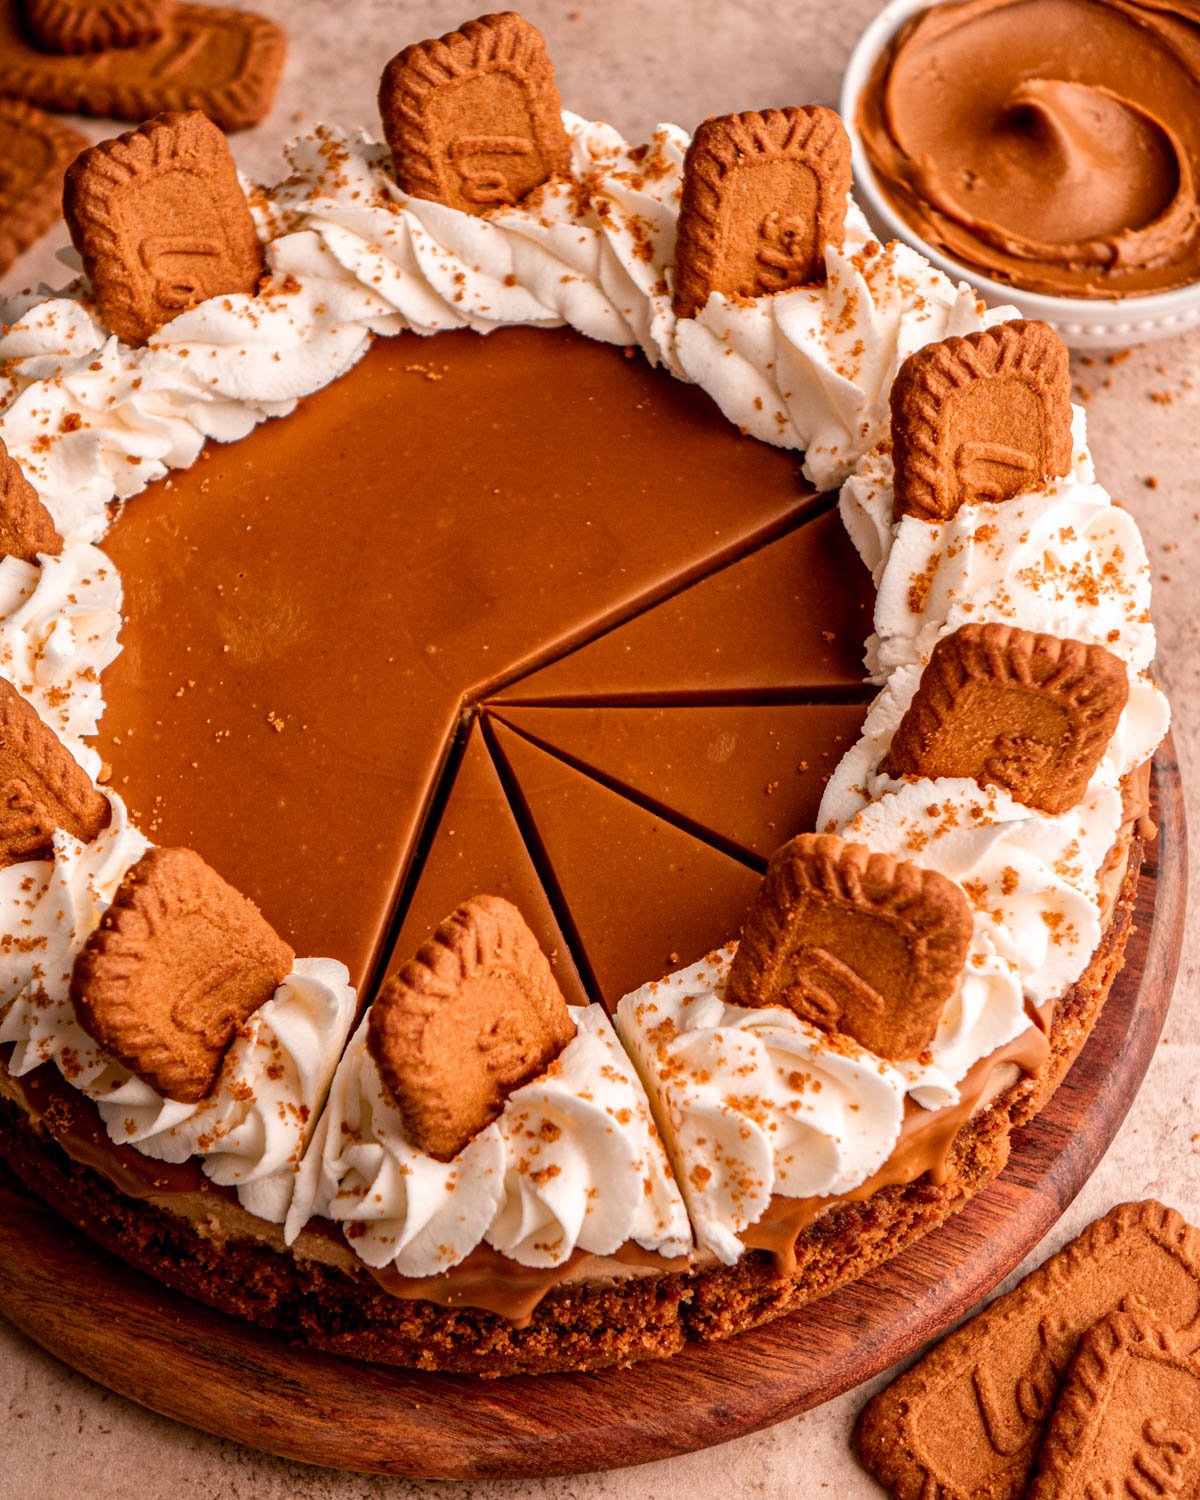
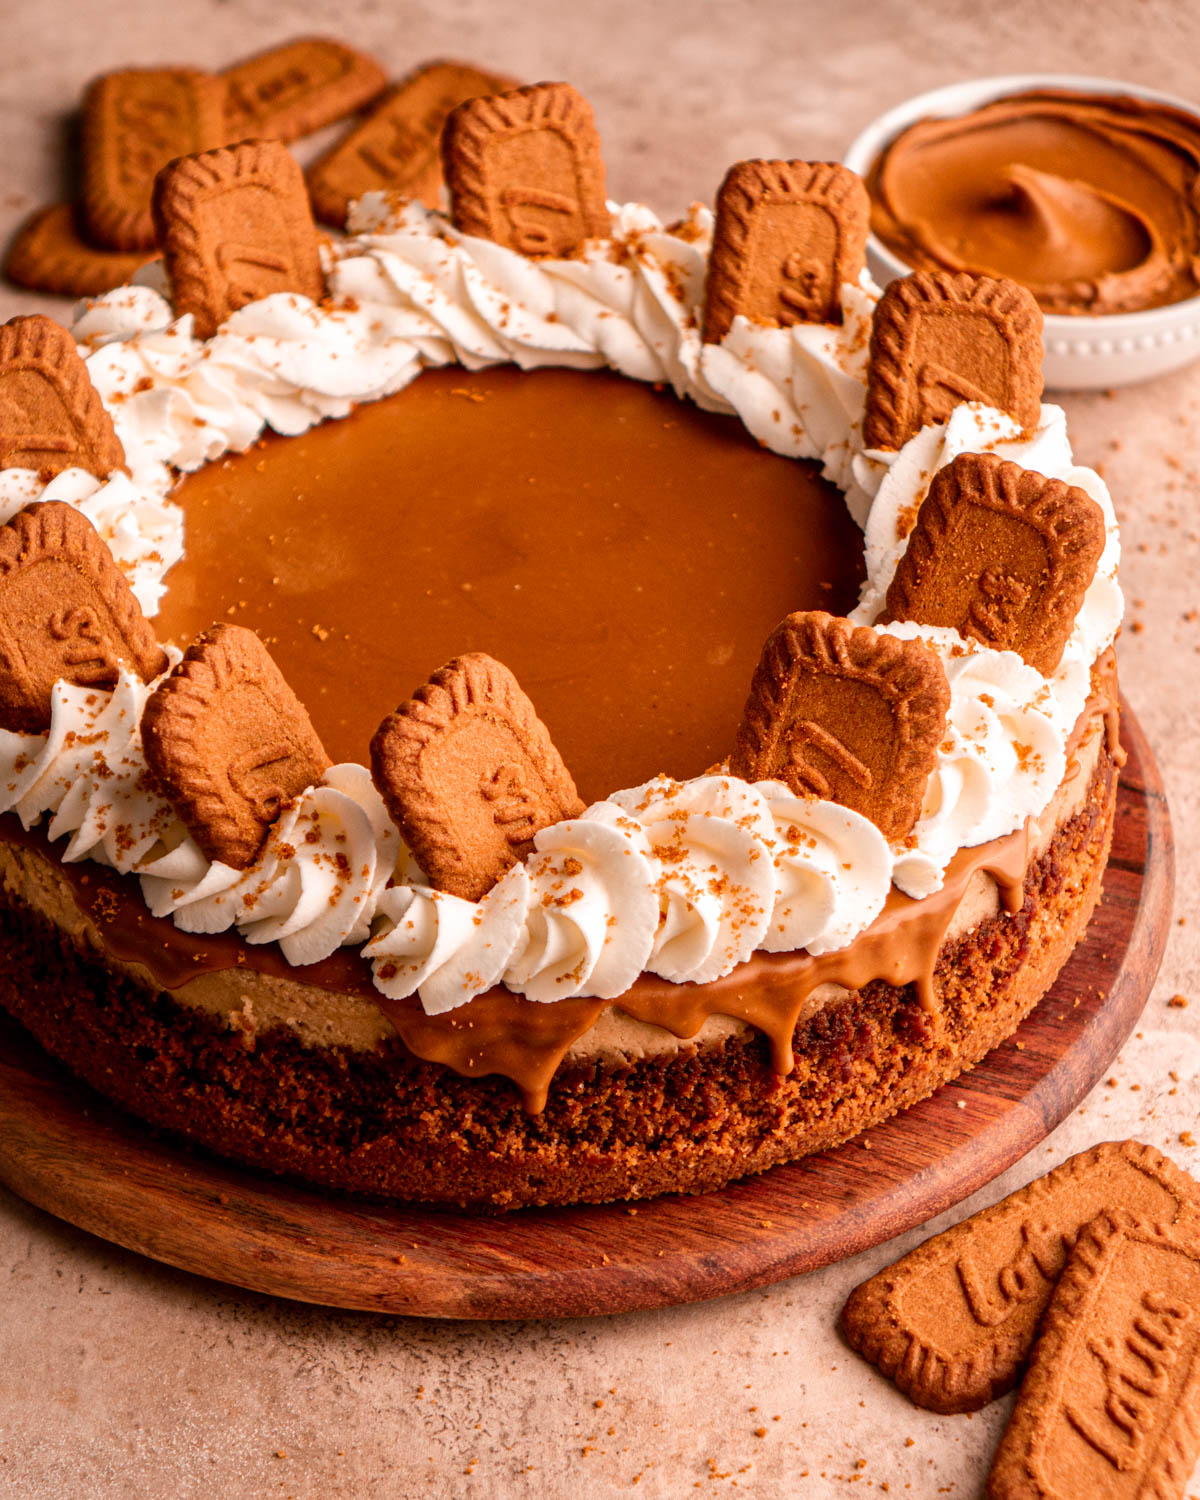
STEP NINE: Transfer the cheesecake to a serving plate, then pour melted Biscoff butter over the top. Smooth it out with a mini offset spatula. Chill the cheesecake in the fridge for 20 minutes, or until the cookie butter is set. Pipe swirls whipped cream on top of the cheesecake and garnish with cookie crumbs and Biscoff cookies. Then serve!
FAQs
Does the cheesecake have to be baked in a water bath? Yes, a water bath is the only way to achieve a perfectly baked cheesecake.
How do I store the cheesecake? Store leftovers in an airtight container in the fridge for up to 5 days. (I like to use a cake carrier.)
Pro Tips
Make sure all your ingredients are at room temperature. This will yield the best cheesecake texture.
Use a 1/4 cup measuring cup to tightly pack the cookie crumbs into the bottom of the springform pan. This will ensure that the crust really sticks together without falling apart when cutting into the cheesecake.
For best results let the cheesecake chill in the fridge for at least 8 hours. This will give it ample time to chill and set up properly.
Don’t over mix your batter. Mix just until the cream cheese isn’t lumpy, and just until the other ingredients are combined. This will give you the best textured cheesecake.
If you make this cheesecake please leave a star review! Also, tag me on Instagram @inbloombakery_ so I can see your creation! Follow me on Pinterest for other dessert ideas!
Other Desserts to Try Next Time
Biscoff Cheesecake
Ingredients
For the Biscoff Crust
- 50 Biscoff cookies
- 10 tbsp (140 g) unsalted butter, melted
- 2 tbsp (25 g) granulated white sugar
For the Biscoff Cookie Butter Cheesecake
- 32 oz. (907 g) cream cheese, at room temperature
- 3/4 cup (150 g) granulated white sugar
- 2 tbsp (16 g) corn starch
- 1 cup (240 g) Biscoff cookie butter
- 1/3 cup (82 g) sour cream, at room temperature
- 1 tbsp (15 ml) vanilla extract
- 3 eggs, at room temperature
- 3 egg yolks, at room temperature
For the Biscoff Cookie Butter Topping
- 3/4 cup (180 g) Biscoff cookie butter, melted
- whipped cream for decoration (optional)
- Biscoff cookies for decoration (optional)
- Biscoff cookie crumbs for decoration (optional)
Instructions
For the Biscoff Cookie Crust
- Preheat the oven to 350 degrees.
- Pulse the Biscoff cookies in a food processor until finely ground.50 Biscoff cookies
- Add in the melted butter and sugar and pulse until combined.10 tbsp (140 g) unsalted butter, melted, 2 tbsp (25 g) granulated white sugar
- Prepare your 9 inch springform pan for its later water bath by wrapping the bottom and sides of it with a decent amount of tinfoil. You want to make sure the tinfoil goes up about two inches on the sides of the pan so no water seeps into the pan as it bakes. I always use too much (around 8 layers) just so I know it’ll be okay.
- When your pan is prepared, press the Biscoff cookie crumbs onto the bottom and about an inch up the sides.
- Bake the crust for 10 minutes, then let it cool completely.
For the Biscoff Cookie Butter Cheesecake
- Preheat the oven to 350 degrees if not still preheated from the crust.
- In a stand mixer, mix the softened cream cheese, corn starch and granulated sugar together with a paddle attachment for two minutes until everything is smooth and there are no lumps. (You can alternatively use a hand mixer). Scrape down the sides and bottom of the bowl to ensure everything has been mixed well. This is a crucial step, if the cream cheese is not smooth here, the cheesecake will have lumps of cream cheese in it when it bakes, so really be sure to mix the cream cheese well.32 oz. (907 g) cream cheese, at room temperature, 3/4 cup (150 g) granulated white sugar, 2 tbsp (16 g) corn starch
- Add the Biscoff cookie butter, vanilla and sour cream to the cream cheese mixture. Mix for 1 minute. Scrape the sides and bottom of bowl again to ensure everything is mixed together.1 cup (240 g) Biscoff cookie butter, 1 tbsp (15 ml) vanilla extract, 1/3 cup (82 g) sour cream, at room temperature
- At this point, stop and put a pot of water on the stove to start boiling for the water bath. You will want enough water to go up about 1 ½ inches on the sides of the springform pan.
- Next add in the eggs and egg yolks one at a time to the cheesecake batter, ensuring that each is fully mixed in before adding the next. As soon as the last one is fully mixed in turn off the mixer. Do not over mix the batter.3 eggs, at room temperature, 3 egg yolks, at room temperature
- Pour the batter into the prepared pan with the crust. Place the cheesecake in a large roasting pan in the oven. Slowly pour the boiling water into the roasting pan around the cheesecake being careful not to splash the cheesecake.
- Bake at 350 degrees for 1 hour. When 1 hour is up, turn off the oven and crack the oven door open using a wooden utensil. Let the cheesecake stay in the oven for 1 more hour. The cheesecake will continue to bake as it is cooling.
- Once the 2 hours are up, remove the cheesecake from the oven and go around the edges of the pan with a butter knife to loosen the crust from the sides of the pan. Let the cheesecake cool completely on the counter, and then refrigerate until cold, at least 8 hours. (I usually bake the night before and let it refrigerate overnight).
- Once the cheesecake has chilled, carefully remove it from the springform pan and transfer it to a serving plate.
For the Biscoff Cookie Butter Topping
- Pour the melted cookie butter on top of the cheesecake. Use a mini offset spatula to smooth it out. Return the cheesecake to the fridge for about 20 minutes, or until the cookie butter is set.3/4 cup (180 g) Biscoff cookie butter, melted
- Once the cookie butter is set, remove the cheesecake from the fridge and pipe swirls of whipped cream around the edges of the cheesecake. Sprinkle with Biscoff cookie crumbs and decorate with Biscoff cookies, then serve!whipped cream for decoration (optional), Biscoff cookies for decoration (optional), Biscoff cookie crumbs for decoration (optional)

Is it 3 whole eggs plus 3 additional egg yolks or just 3 eggs
This recipe is incredible! I was looking for a solid biscoff cheesecake recipe that didn’t use a bunch of shortcuts, as I’m a pretty skilled baker and wanted more challenge. I cannot tell you how popular this has been in my circles! I made it the first time for Thanksgiving this past year, and it was an all-star. One friend forced me to teach him it, and we worked on a chocolate variant as well. This month alone, I have had three separate people ask for this for their birthday cakes! Thank you for such a wonderful recipe that has been so beloved already!
This is a great recipe–comes out perfect! Delicious
I’m so glad you like it! Thanks for trying it 🙂
Came out great wouldn’t let me share the picture. But it came out perfect and tasted even better
I have to make this cheesecake 3 days ahead of time so I was wondering if it would it be better to freeze the cheesecake once fully assembled or store it in the fridge? Or would freezing it before adding the cookie butter topping be better? Thanks for your help!
Can this cheesecake be frozen ahead of time
Any recommendations for making in a 9 x13 pan?
How would you recommend making this into mini cheesecakes
Cheesecake is amazing !! I did have a hard time getting the crust off the pan even though I sprayed it. It seemed to be coming apart.
This has to be the worst baking website on the Internet. I can’t access the recipe with all the popups and intrusive ads. After trying for 10 minutes I’m just giving up. Why even bother having a website?
The crust doesn’t need that many cookies. It’s way too many. Next time, I’ll try it with about half the cookies.
The cheesecake was delicious-agree too many cookies for crust. Pain in the rear to print your recipe. Think you need to change that method. Otherwise I won’t follow your posts.
Incredible! This cheesecake recipe is a 10/10! I will definitely be saving this one to make again sometime.